
Recent News
View all
How to lock down a ServiceNow app *very* securely (Part 3 of 3)
How to lock down a ServiceNow app *very* securely (Part 2 of 3)
How to lock down a ServiceNow app *very* securely (Part 1 of 3)
Conference Sessions
Write your own Outlook add-in that exposes ServiceNow UI natively inside emails
CCB1126-K22
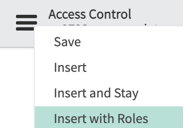
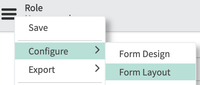
## Transcript X-TIMESTAMP-MAP=LOCAL:00:00:00.000,MPEGTS:0 [MUSIC PLAYING] Hello, everyone. Welcome to my session, Outlook Add-Ins for ServiceNow, where I'll show you how to expose service portal natively inside of Microsoft Outlook. A little bit about me-- I've been at ServiceNow for 10 years, which means that that's one fourth of my 40-year coding experience and, frankly, one fourth of my entire career. My name is Grant Hulbert, and I'm the Director of Innovation for Corporate Strategy. Today, we're going to talk about what the problem is-- too much copy and paste and swivel chair. We'll talk about the solution, which is Outlook add-ins for ServiceNow. And we'll actually walk through installing the solution, and then we'll talk a little bit about customizing and debugging, and how you can make changes to this yourself. So first off the problem-- imagine that you've received an email-- and I'm sure this happens all the time-- where you are asked to do something that probably needs to be reported as an incident or a customer service case. So in this case, somebody sent me an email with a request. Well, what do you do every time you do that? You, first of all, have to slide your email a little off to the side. You have to then open a browser, log in to your incident management system, and then you have to go over to the email side and copy the username. Go to the other side, paste the username. Copy the issue from the subject line. Paste the issue into the subject line. Copy the comments. Paste the comments. And then, finally submit. And then, finally get back to your work. And this seems like an awful lot of swivel chair, an awful lot of work, for something that really should be automated. So let's talk about the solution. And the hint's right there on the screen. What would happen if we just never left Outlook? Well, this is the solution. You have the ability to write Outlook add-ins, where your icons and menus appear right there on the screen directly inside of Outlook. And when this task pane that Microsoft provides slides down the side, you as a coder have the ability to put your service portal into that spot, right inside of Outlook, and you can have all of the data from the email pre-filled into that form in ServiceNow. And then, after you submit this incident, you can click to view it. And sure enough, there in ServiceNow is all the information that came Outlook. I don't know about you, but this is potentially life-changing. It seems terribly mundane, but, frankly, being able to get rid of all of that copy and paste and be able to have ServiceNow itself showing up inside of Outlook, to me, just changes everything for myself, and for employees, and for my stakeholders. So let's talk about what you as a coder get. This is really cool. I just get so excited about this. Microsoft has created an API where all of the data in that email can be queried from client side. And in our case, what ServiceNow engineers have created is a way for you to see that inside of portal client side code. So you actually get access, through APIs, to everything inside of that email-- the subject, the body. There's tons of stuff that we'll talk about towards the end here. And then, of course, any arbitrary service portal that you can design-- the one I'm showing here is out of box, but you can create any service portal and have that appear, again, directly inside of Outlook. So let's go through the steps of installing it, because I know when I'm looking at these kinds of demos, a lot of times they leave the installation steps out and sometimes it can be a little bit confusing. So I'll take you through every step of installing it. It's actually pretty easy. And good news is this has been around since the Paris release. So first step, you just go up to your list of plugins and click Plugins. And then what you'll search for is add-ins, or the com.sn_outlook_addin and install it. So after that Outlook add-in plugin is installed, you'll find that there is a list of manifests. And these office add-in manifests are the starting point for these apps that are projected inside of Outlook. So in our case, this came out of box ServiceNow for ITSM. So we'll click inside of this manifest, and you can see here, that there is, up under the hamburger menu, Copy Manifest URL. So when you click that, the idea is that you need this on your clipboard for the next installation step. So we'll copy this manifest URL, and then we'll switch back over to Outlook. Now, inside of Outlook, if you have the new Outlook user interface, you'll see the little three dots up top here. You click on those three dots, and then you can see that you can get add-ins. So we'll click Get Add-ins here, and a dialog box appears that allows you to add more Outlook add-ins. And in our case, we'll click the My Add-ins. And then, all the way down at the bottom, we can say Add from URL. And this presents a dialog box where you paste in what you copied earlier. So it's really cool, because ServiceNow actually builds this manifest URL for you. The app does that for you. And people in the email IT part of your company can actually provide this link as basically a base system. They can actually push this out to everyone in your company who's using Outlook and automatically have lists installed if you want. But in our case as the developer, we'll just paste it in manually. And now, after you've installed that, you'll immediately see this menu bar. And that is evidence that you're add-in was installed and is functioning. So I imagine the next thing you want to do is see what it takes to customize the code. In our case, we'll open a portal widget. Because what the Outlook add-in out-of-box product provides is a whole bunch of widgets-- one for creating incidents and one for creating BTB tasks. So we'll type portal in the nav. Click the widgets. And it's a little hard to, find because there's a lot of widgets, so search for star outlook. And then you'll see that there's a widget called outlook_create_incident. That is the widget that actually appears in the slide-in task pane over in Outlook. and we'll click inside to create the incident. Scroll down to the bottom of this, and open the widget editor. Now, for those of you who are familiar with ServiceNow portal, this is technology that's been around forever. If you're not familiar, this is basically kind of a very standard Angular.js layout for creating widgets. But I want to draw your attention to the centerpiece here, the client script. So this is running client side. When you run Outlook, you actually are effectively running a web browser. Outlook is, of course, a native app, but inside of Outlook, that little slide-in pane is a web browser. And that browser is projecting JavaScript, HTML, all of that stuff. So when our slide-in task pane comes on with this particular portal widget, we can look at the source code that's running in the client side of the browser. So I searched here for office. And you can see here that we are accessing the end user's client browser, looking for Window.office.co ntext.mailbox.item. And what this is is we've basically exposed Outlook's APIs directly inside of here. And so, this is all Outlook's syntax for subject, and body, and all the information that you can get out of that. Now, notice here that we have a data view of Outlook. What this is is this makes it easier for the plugin to only show the fields that are in a particular specific view in your incident form. Remember, this is out of the box. You'll be able to customize it however you like. But on the incident form, this plugin adds a new view called Outlook, and that enables you to really easily customize that particular form. And then, also notice that I've pre-added-- you wouldn't see this if you followed along. I pasted it in one more line of code here, because I wanted to do something kind of useful-- have a correlation ID for the incoming email that I could then store inside of the incident that's created. That way you can have a data connection between the email and the created incident. So now, let's go see what this looks like inside of incident. We'll open up just a random incident here, and we'll switch to the Outlook view that I mentioned before. And then we'll switch to the form layout. Because what we're going to do is add one more field onto this form to make it visible on the slide-in pane in Outlook. So let's click that form layout. And we'll select the Correlation ID, bring it over to the other side, and click Save. Notice that the result of this is that we now have a new Correlation ID field showing up. This is all out of boxes. This Correlation ID is part of the incident table already, but we're just making it visible so that we can show it in our demo. The idea here is that you, when you want to put in your own cool add-ons to this, would pick any other fields that you want. I'm just showing you one example-- one that's actually somewhat useful. So now, when we reload the task pane inside of Outlook, you can see that this Correlation ID appears here. And that's the actual string that comes from the Outlook email and from their APIs. So let's talk about debugging. It turns out that because this whole region here, this pane on the right-hand side, is an actual webkit browser view, you can right-click and treat it just like a browser. So in this case I right-click and choose Inspect Element, and a typical webkit browser inspector appears. So here you can set breakpoints, you can see how your JavaScript is running-- basically all the stuff that you would do is if you are in a browser. But notice that this is actually in Outlook. So you're not going to ever see this in your browser, in the sense that Outlook provides its own browser and its own environment. And here is the Microsoft documentation. I just brought you to one page. There's plenty of docs online if you Google for office add-ins. But the idea here is, down at the bottom, you can see this is Microsoft Docs on this mailbox item-- the blind carbon copy, the body. And if we were to scroll through here, you would see tons and tons of information, including things about calendar items-- basically just everything you'd want to get out of a user's email. So what's next? Well, what I would suggest to you is that you clone the base system manifest, that manifest that we opened earlier to grab the URL from, and start your own add-on. That gives you the chance to create your own plugins, create your own menu items, create basically all the functionality that you want so that you're not interfering with the base system one. Then I'd suggest that you Google for Microsoft's Outlook Add-ins APIs and see what they can provide. This slide deck does provide links to that. So if you get the slide deck, then just go to the bottom and you'll and you'll find those links. And that's something I haven't had a chance to do yet. Notice that I've been talking about service portal. Service portal is really pretty old technology. It works great. I love the look of it. But nowadays everything's about UI Builder. So if any of you find out that UI Builder displays just as easily inside of these little slide-in panes-- I see no reason why they shouldn't-- please let me know and let the world know what you find. And finally, just have fun with this. Enjoy making your users' lives easier. I certainly find that I became the hero. As soon as I enabled this functionality for my users, they were beside themselves with joy. And being able to reduce all of their swivel chair and all of their copy and paste, I practically got a parade out of it. So hopefully you will, too. Thank you everyone for joining this session. I hope you enjoy building your own Outlook plugins and add-ons. And the slide deck contains resources. These are hyperlinks to the various parts of the technology that I've showed you today. Enjoy. [MUSIC PLAYING]