
How to lock down a ServiceNow app *very* securely (Part 2 of 3)
| Part 1 | Part 2 (you are here) | Part 3 |
|---|
In part 1 of this series, you learned how to configure a simple ServiceNow app to securely restrict access to its data, even from other ServiceNow admins. In this article, you’ll learn how to extend that app’s table security so that only people from certain groups can see specific rows. This is called row-level security.
Why would you want to make some rows only visible to certain groups of people? Imagine your company has several departments who want to use your app, but they don’t want to share data with each other. (Perhaps there is some sensitive data that should not be leaked outside a group.) We’ll make it easy to lock down individual rows, so each department has its own private view of your app. As far as your users are concerned, they won’t even know that other people are using your awesome app.
Let’s continue!
Prerequisite: make sure you have already followed all the steps in part 1, because we’ll be adding new features to the app we built. You must be logged in as the same administrator that owns the application you built in part 1.
- Launch Studio, select your app, and select the table “Secure Data”.
- Add a column labeled “Group Owning this Record”: make it of type “Reference” and configure it to reference table sys_user_group.
- In preparation for editing table roles, elevate your role to security_admin.
- Notice there are 4 Access Controls (ACLs) on your table: delete, read, write, and create. In the next steps, you will edit 3 of these, and add 2 new ones.
- Edit the delete ACL, adding a condition “Group owning this record is (dynamic) One of My Groups”.
- Do the same for the read ACL.
- Do the same for the write ACL.
- Create a new ACL on your secure_data table, with Operation=read
- Tick [x] Advanced, scroll down to the Script section, and paste this script:
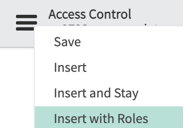
answer = current.isNewRecord(); - Select the create ACL. Select hamburger icon > Insert with Roles
- Make sure to choose * in the fields column next to the table name.
- Click [Update] to save the new create ACL you just made.
- Edit the delete ACL, adding a condition “Group owning this record is (dynamic) One of My Groups”.
- Now we’re going to create 2 groups that have access to your app:
- In Studio, look under Access Control > Roles, and memorize the name of the secure_data_user role. It should look something like x_NNNN_secure_data.secure_data_user.
- Create a new group. (You will need to switch browser tabs; leave the Studio tab open.) Name the group “Secure Group 1”.
- Edit the roles, adding your x_NNNN_secure_data.secure_data_user role.
- Edit the group members, adding “Abel Tuter” to the group.
- Create another group named “Secure Group 2”, and add the same role to it.
- Edit the group members, adding “Beth Anglin”.
- In Studio, look under Access Control > Roles, and memorize the name of the secure_data_user role. It should look something like x_NNNN_secure_data.secure_data_user.
- Go back to your Studio browser tab, and create a new business rule in your app:
- Name it “Mark records as owned by logged-in user”
- Select your secure_data table
- tick the [x] Insert checkbox
- Tick [x] Advanced
- Click the [Advanced] tab, and replace the entire example script with the following:
- (function executeRule(current, previous /*null when async*/) {
// Set the group ownership of this record to the currently logged-in user's secure group
var gr = new GlideRecord('sys_user_grmember');
gr.addQuery('user', gs.getUserID());
gr.addEncodedQuery('group.roles=x_NNNN_secure_data.secure_data_user');
gr.query();
if (gr.next()) {
current.group_owning_this_record = gr.group.toString();
}
})(current, previous);
- (function executeRule(current, previous /*null when async*/) {
- You will have to modify the script slightly. On line 6, change x_NNNN_secure_data.secure_data_user to be the exact name of the secure_data_user role you assigned to the “Secure Group 1” group
- Name it “Mark records as owned by logged-in user”
- Try it out!
- Log out, and log back in as user “Normal Admin” (remember creating this user back in part 1?)
- Notice you cannot see your app in the left nav.
- While still logged in as “Normal Admin”, impersonate System Administrator (username=admin).
- Notice you cannot see the app’s tables. Notice you cannot add “Secure Group 1” to your own groups. Notice you cannot add any secure app roles to your roles. Why not? You would think impersonating System Administrator would confer all privileges, including “Application Administration”. Answer: because you’re not really logged in as that user; you’re merely impersonating, and ServiceNow’s engineers were smart enough to prevent this potential security breach!
- Impersonate Abel Tuter; notice you cannot see the app or any of its records. Why not? Again, you’re merely impersonating Abel, and because this app is so tightly secured, you are not allowed to see his records, even when you’re impersonating.
- Navigate to Scripts - Background and create a script that queries records from your table; notice you can see all records, regardless of “Group Owning this Record”. Because background scripts run at a very low level without ACLs, they are able to avoid security restrictions. Even though admins will have to go to great lengths to see your app’s data, you should be aware that it’s possible.
- Log out, and log back in as user “Normal Admin” (remember creating this user back in part 1?)

Conclusions:
- Regular users cannot see data that does not belong to one of their groups, even though all the data is stored in a single table. This is analogous to Domain Separation, but of course, not nearly as sophisticated!
- Users who do not have app roles cannot see any data at all.
- “Other” Admins cannot edit the app in Studio, and cannot add themselves to groups or roles in the app.
- Maint user can see everything; that’s what Maint is for

- “Other” Admins can see data if they go out of their way to run Scripts - Background.
- Casual admin activity will not see the data
There's more!
In part 3, the conclusion to this series, we'll add more polish to the app by creating a user management feature that makes it easy to assign users to groups, and disambiguate users who belong to multiple secure groups.
| Part 1 | Part 2 (you are here) | Part 3 |
|---|

https://www.servicenow.com/community/developer-articles/how-to-lock-down-a-servicenow-app-very-securely-part-2-of-3/ta-p/2465674