
Workspace for a custom app: buttons
In my previous posts I talked about how to start with Workspace for a custom app and how to configure forms for your records. Now let's talk about buttons.
Now, when forms are configured let's add some buttons. First, let's start with form buttons. Of course, you can just add a button component in UI Builder and configure it to do whatever you want, but I can't think of any reason why it would be a good idea. No, probably I can... Let's not go there and focus on more realistic scenarios.
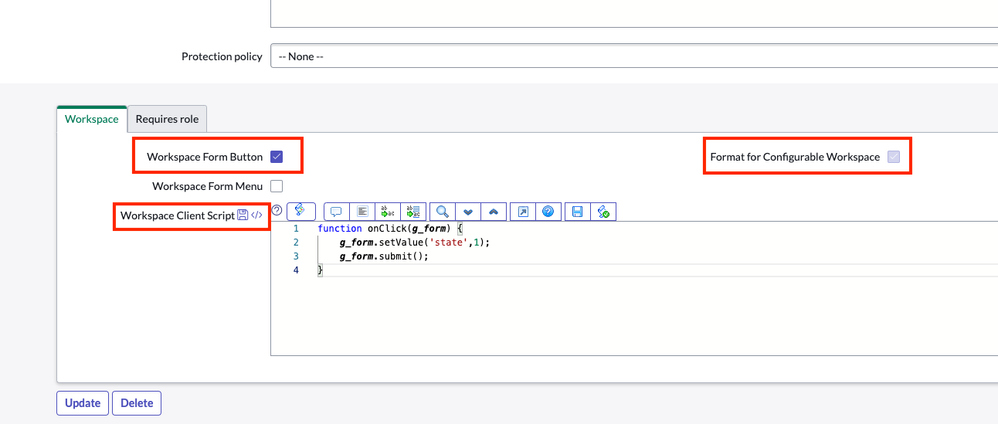
In my app I'd like to have button that changes the state of the record, so I just created a good old UI Action. To make it visible in the workspace you need to fill a couple additional fields. First, select "Workspace Form Button", then "Format for Configurable Workspace" and finally write what this button should do. Easy!

You probably noticed that in workspace all UI Actions work on client side. I'm not sure how I feel about it, but that's the side effect of using workspace. By the way, you can easily have server-side UI Action that executes client-side script in the workspace!
Now my new button is visible in the workspace, but I noticed an issue with position of the action bar.

I saw this issue several times before, so I'm pretty sure it's not just my instance. To fix it you'll have to go to UI Builder and play with position of action bar. The way I usually fix it, I select Top Container, set Direction to row and J*ustify content* to space-between.

If form buttons can be configured more or less the same way as before, related list buttons are completely different. All related list buttons are located in sys_declarative_action_assignment table. To find them go to Workspace Experience -> Actions & Components -> Related List Actions. Let's play around with them a little.
Hiding New button.
First thing I'd like to do in my app is to hide New button on a related list. If you open Related List Actions and search for New button on Global table, you'll find 4 records. One of them is for m2m tables, another for Service Operations workspace only and the one you need is this one:

Open this record and create an exclusion for New button. On Action Exclusions create a new record, select your table name and select Exclude this table checkbox. New button is not visible on the related list anymore!

Actions configuration
Next thing I'd like to do is to add a few buttons to m2m table.
But before creating these buttons I'd like to do one more thing - create an action config record. It's not really mandatory, but I find it handy to have one config record with all my custom buttons. Additionally, it provides some styling functionalities. To create new action config go to Now Experience Framework -> Actions & Events -> Ux Form Actions Configs and create a new record. We'll associate all our buttons with this record now.
But we also need to tell our workspace to use this config, so go to UX Application (read about how to do it here), find actionConfigId UX Page Property and replace its value with sys_id of new action config. Now we can continue with buttons.

M2M buttons
I'd like to have functionality similar to old UI: New button to create a new record a something like Edit button to associate existing records. But, since it's not old UI anymore, we'll go with 3 buttons instead: New, Add, Remove.
New button
New button should create a new record for a child table and a relationship between parent and child records.
This task is already half-done by ServiceNow, so you need to do just a few things.
- First, create a new button, select you m2m table and view you're using in workspace.
- Set Action label as New, set something in Action name and select UXF Client Action in Implemented As field.
- Now you need to select Create New Record ManyToMany client action.
- And the last step, on Action Configurations related list associate you button with Action Config you've created before.

That's it! You should see you button on the related list now.
Remove button
Now let's add Remove button to delete relationship. It will not delete the child record itself, only relationship between them.
- Same as before, create a new button, select you m2m table and view you're using in workspace.
- Set Action label as Remove, set something in Action name and select Server Script in Implemented As field.
- Save record and select Advanced view.
- Select Record Selection Required checkbox. This is needed to select which record we want to remove.
- Go to Server Script and write
current.deleteRecord(); - And the last step, on Action Configurations related list associate you button with Action Config you've created before.

Add button
Last button we need to configure is Add button. This button should open a modal that allows user to select which child records should be associated with the parent record. To do that we need to use a Multi-Record Associator component in our modal. Thankfully, this modal is already configured OOTB, so we just need to call it.
Create new event
First, we need an event that will open the modal. Since it's a custom workspace there are no pre-configured events in it, so I'll create a new one. I prefer to use one event that will open a viewport modal and to configure all sorts of subpages for this modal. Let's call this event RECORD#OPEN_MODAL, this is how the same type of event is called in OOTB workspaces (but you can call it something else).
- Open your record in UI Builder, select top-level component (usually called Body).
- Add new handled event to the component.
- Call it the way you want, but notice the format of the event name. I'm not sure what will happen if you use other format, but I prefer to stick with it.
- Add payload fields. Since I'm going to use the same event for opening different subpages I need to pass 3 parameters in the payload:
- route - name of the subpage;
- fields - required parameters;
- params - optional parameters.
- route - name of the subpage;


Next step is to open a modal when this event is fired. We are going to open preconfigured modal, you can find it in the modals list (see Modal Container).
- Create new event mapping.
- Select [Record Page] Open Modal - Data resource event handler. This is an OOTB event handler that will open preconfigured viewport modal.
- Fill payload parameters that should be passed, see screenshot below.

Create Add button
Now the event part is done and we need to create a button that will fire this event. This button is created the same way as all other related list buttons.
- Create a new button, select you m2m table and view you're using in workspace.
- Set Action label as Add, set something in Action name and select UXF Client Action in Implemented As field.
- Now you need to create new client action, let's call it Idea Task MRA. Notice the format of action key (see screenshot below).
- Fill the payload of the action. In this payload you need to put the actual values you want to send to the event. For MRA modal they should look like this:
{ "size":"lg", "route": "mra", "fields": { "query": "{{query}}", "table": "{{table}}", "parentRecordSysId": "{{parentRecordSysId}}", "userGivenTable": "x_snc_home_autom_0_automation_task", "label": "Add", "parentFieldName": "x_snc_home_autom_0_automation_idea", "referencedFieldName": "x_snc_home_autom_0_automation_task", "extensionPoint": "DEFAULT", "columns": "number,short_description,state", "hideSelectAll": false, "relatedListName": "{{relatedListName}}" }, "params": { "type": "m2m" } }
- route - mra;
- fields must contain:
* query - query defined for related list, use {{query}} variable;
* table - table name of m2m table, use {{table}} variable;
* parentRecordSysId - sys_id of parent record, use {{parentRecordSysId}} variable;
* userGivenTable - table name child record;
* label - title of the modal;
* parentFieldName - column on m2m table where you store parent record;
* referencedFieldName - column on m2m table where you store child record;
* extensionPoint - used to add additional filter to the list shown in the modal. If you want to see all records set it to DEFAULT;
* columns - columns from child table that you want to show in the modal;
* hideSelectAll - hides option to select all records;
* relatedListName - name of the related list, use {{relatedListName}} variable; - params must contain:
* type - m2m (for m2m table).- On Action Configurations related list associate you button with Action Config you've created before.

Associate button with event
Next, we need to associate our action with the event, so ServiceNow will know which event to fire. To do that on Action Assignment record you've created in step 1 create new Event mapping (via related list).

Follow these steps:
- Create new Event Mapping.
- Fill the fields in the event mapping:
- Source element ID - id of the component where you button is located. In our example it's related list and component is called list_related (you can find this ID in UI Builder);
- Source Declarative Action - auto-populated;
- Parent Macroponent - name of your record page;
- Target Event - event you created before;
- Target Payload Mapping - this is mapping between event's payload and client action payload we've created before, for this example you can use this code:
{ "type": "MAP_CONTAINER", "container": { "route": { "type": "EVENT_PAYLOAD_BINDING", "binding": { "address": [ "route" ] } }, "fields": { "type": "EVENT_PAYLOAD_BINDING", "binding": { "address": [ "fields" ] } }, "size": { "type": "EVENT_PAYLOAD_BINDING", "binding": { "address": [ "size" ] } }, "params": { "type": "EVENT_PAYLOAD_BINDING", "binding": { "address": [ "params" ] } } } }
- Source element ID - id of the component where you button is located. In our example it's related list and component is called list_related (you can find this ID in UI Builder);
- This is how event mapping should look like:

Now all 3 buttons should be visible on the related list and work as expected.

Control visibility of the buttons
The last thing I'd like to do in this post is to make these buttons visible only under certain conditions. First, they should be visible only to users who has rights to create records in m2m table. Additionally I'd like to show them only when the state of parent record is accepted.
To do this, let's open a button and switch to Advanced view. Now you should be able to see Conditions tab, let's go there. On this tab you can populate role conditions, client conditions (like parent record is new), record conditions and script conditions.
For my scenario I'll add a script condition to show buttons only when parent record is in state "Accepted" ( there is parent variable for it). You can also call a Script Include from this field.
Note! Record Conditions can be used for form buttons, but they will not work for related list buttons.

Confirmation message
Oh, and last thing! I'd like to show a confirmation message when I remove a record from related list:

Result:

In my next post you'll read about how to add some nice UI features to your custom workspace: Workspace for a custom app: headers, highlighted values, sidebar
https://www.servicenow.com/community/next-experience-blog/workspace-for-a-custom-app-buttons/ba-p/2603633