
Custom Layout for sp-model/spModel ( Istanbul )
When using this feature make sure you test the layout looks good on your mobile device too. One reason I believe that ServiceNow is sticking to the 2 column layout is to make the UI responsive.
Finally I appreciate if you can provide some feedback about this approach 
There is much less intrusive way to change the layout, which I will explain in a subsequent post.
- * Can I display a label next to a field rather than on the top of the field ?
Why do we need Custom Layout for the Form-Widget
ServiceNow Form Views
How does Service Portal layouts the Fields in a Form-Widget
The Layout of Fields is derived from the FORM-View that is configured in ServiceNow Standard Platform.
ServicePortal Form Widget can be configured to use a specific view that is created in the Standard ServiceNow Platform. The Form will look the same in both ServiceNow Platform and ServicePortal.
Form-Widget retrieves the layout of the configured view and uses OTB template (sp_model.xml) to render the form. sp_model.xml is HTML code that can be processed by AngularJS.
Can we configure to display more than 2 fields in a row in the ServiceNow Form View ?
No
Can we Hide the label of a field if required in the ServiceNow Form View ?
No
Can we change position of the label in the ServiceNow Form View ?
No
Can we create a form which doesn't look like the way we created in ServiceNow Platform.
- List of all the Attachments
- UI Actions Links
- ServiceNow Form-View
- Related Lists
- Save or New Button
- Display which Mandatory Fields needs to be filled.
AngularJS Directive : spModel
ServicePortal uses AngularJS directive called spModel to render the fields of a Form-View. spModel directive is developed by ServicePortal and is automatically available for all the widgets.spModel directive provides many features that are required for a form-fields.
- required fields
- associate client scripts to the fields
- Handle UI Policies
- Field length validation and many more
Usage of spModel in Form-Widget:
HTML Code:
form_model - requires JSON Data with information about Form Sections / Fields / Layout of the Fields / required fields / Field Labels / Client Script functions / Save or New Functions.
Calling $sp.getForm in server script is required to pass data to the spModel
mandatory - JSON Data with any additional required attributes.
Note:
spModel directive is referred as sp-model in the HTML(AngularJS specific)
Server Script:
data.f = $sp.getForm(data.table, data.sys_id, data.view);
data.table = table name
data.sys_id = valid Sys ID or -1 for a new record
data.view = name of the FORM View / Don't pass the parameter for default View.
$sp.getForm is implemented by ServiceNow. It calls ServiceNow Server Function to retrieve data related to Fields / Sections / Client Scripts / UI Policies / field Lengths.
templateURL
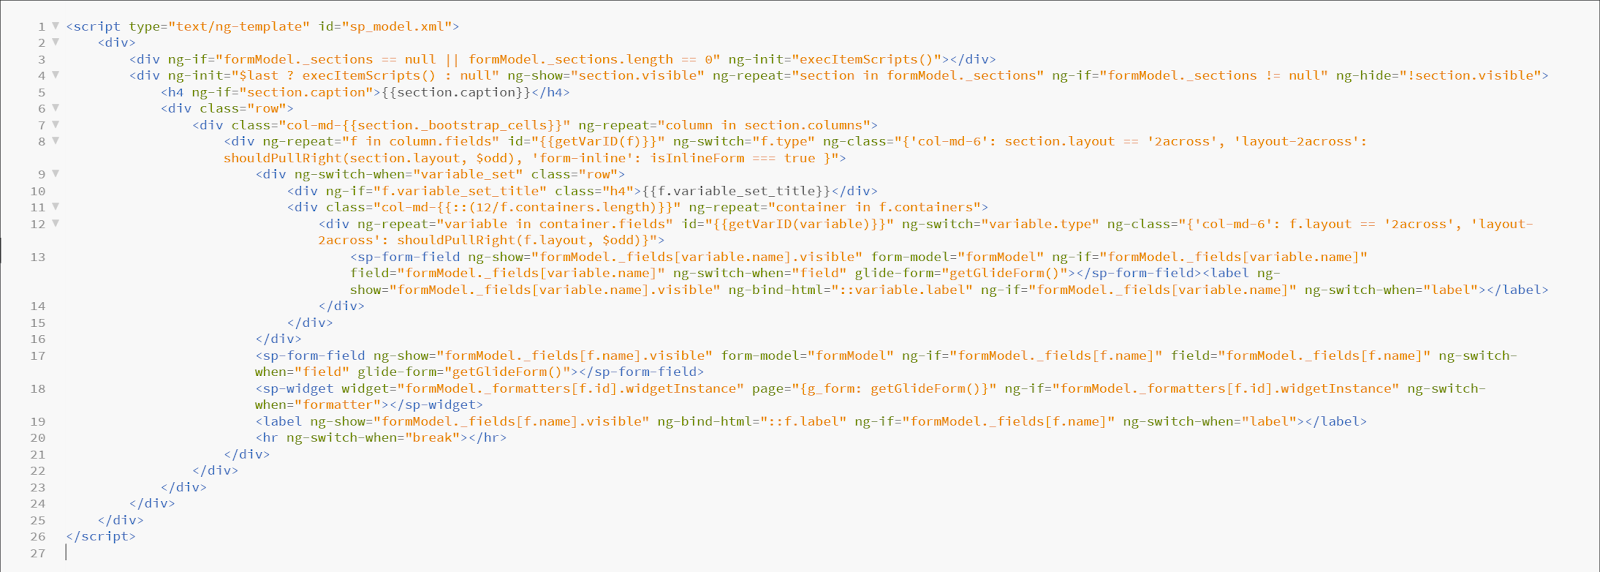
spModel directive uses sp_model.xml (ng-template) to render the fields on a form. ServicePortal includes sp_model.xml in all of its pages. ng-template is HTML Code that could include AngularTags and is processed by AngularJS.
The templateUrl in the spModel directive uses sp_model.xml that is automatically included by the ServicePortal in all its pages. It is not possible to change the way spModel renders the Form View.


As a ServicePortal Developer we don't have control to make changes to spModel directive and the template it will use. But we can create a new Directive ( Widget Angular Provider ) which extends the OTB spModel Directive but provide a new source for templateUrl attribute.
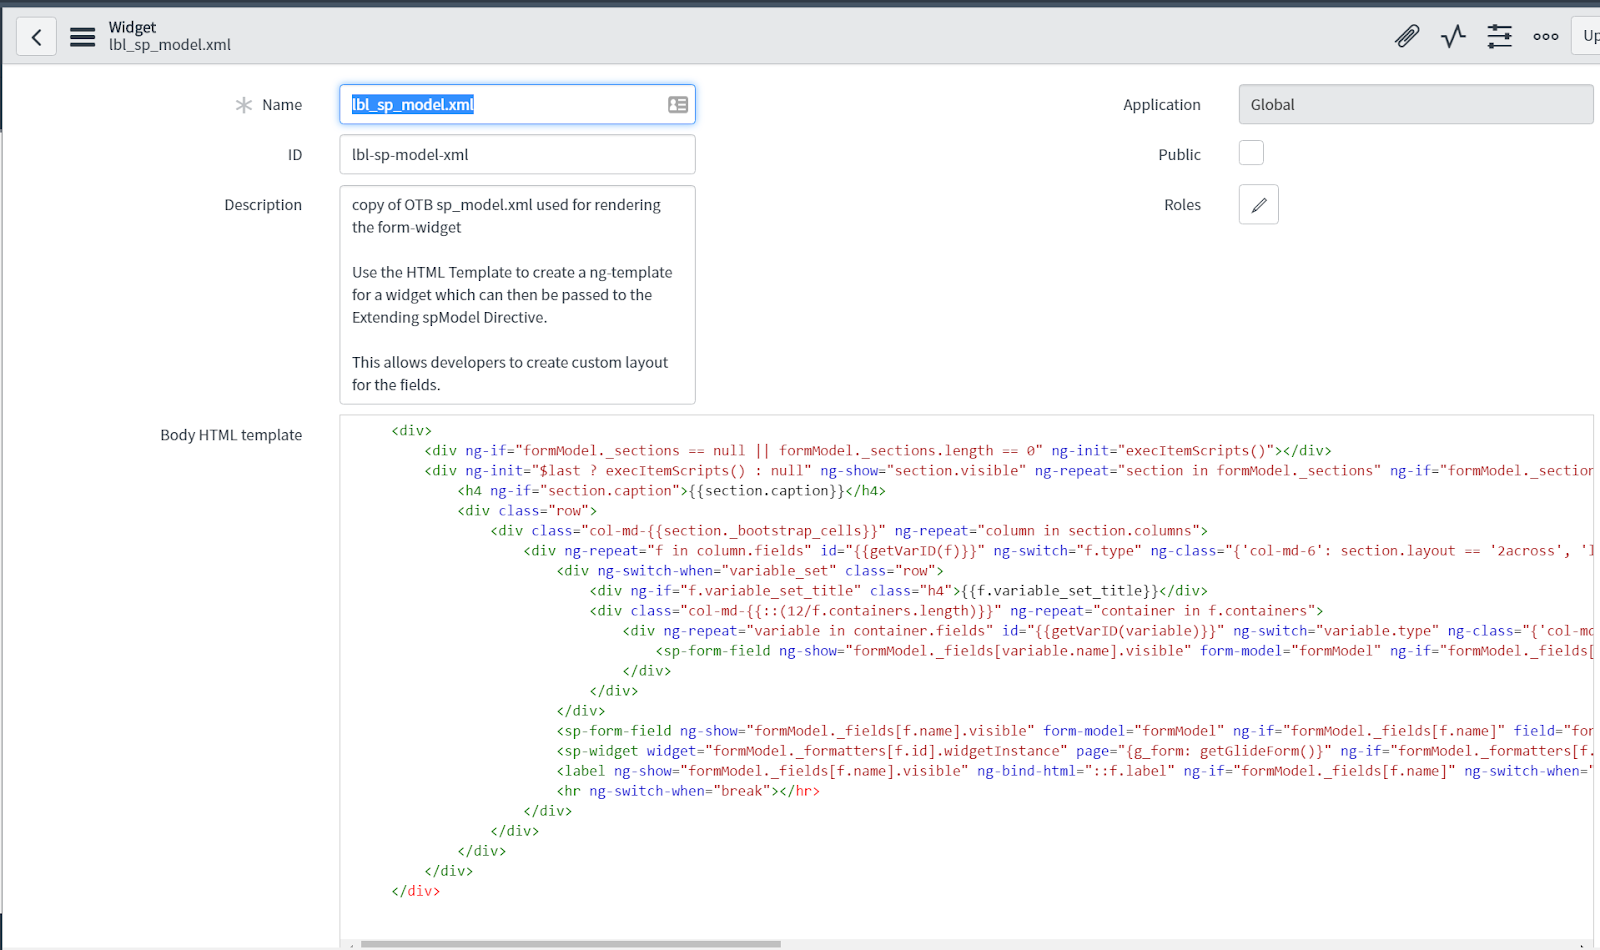
One Time Task 1: Admin will create a new Widget to copy the OTB sp-model.xml in a widget for easy access. Developers can always use the browser tools to retrieve the sp-model.xml
Step 1: Navigate to ServicePortal > Widgets > create a new widget with widget id "lbl-sp-model-xml"
Step 2: Copy the code from the script tag of sp_model.xml using browser tools
Step 3: Paste the code in the HTML Template of the widget.


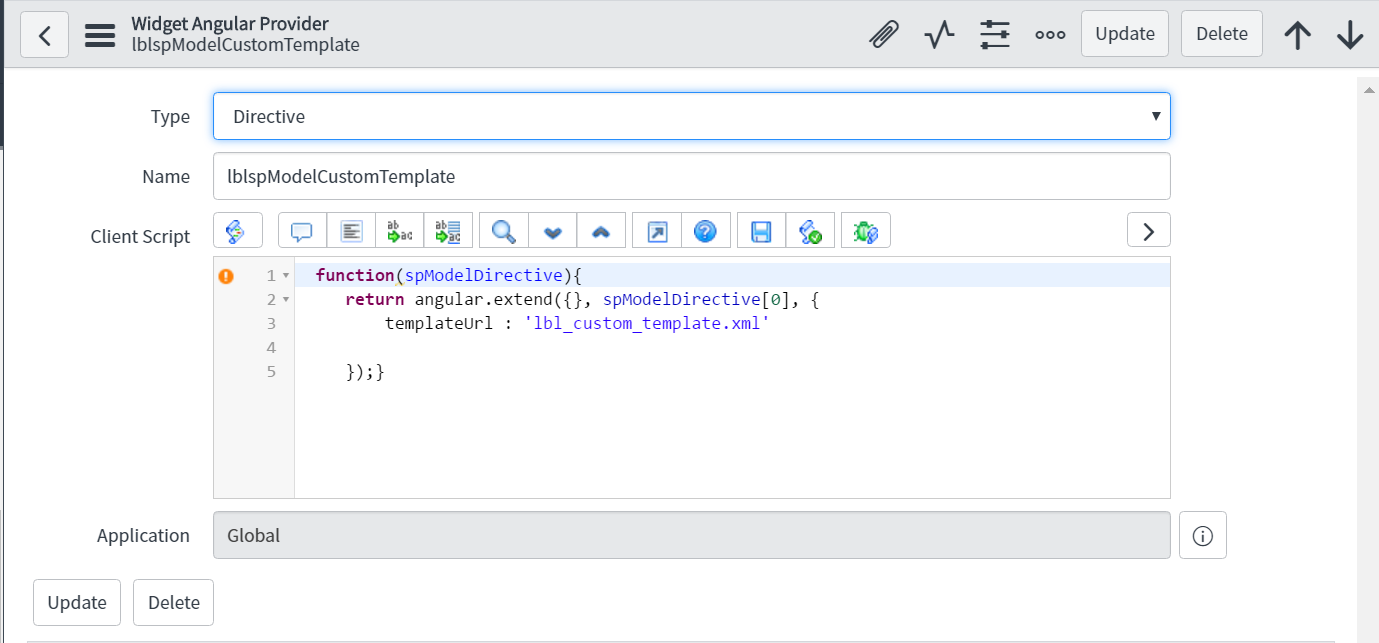
One Time Task 2: Admin will create a new Widget Angular Provider that extends the OTB spModel Directive. The new directive lblspModelCustomTemplate will inherit all the features of spModel but with a new source for the templateUrl.
Now we need to use the new Directive in the place of spModel Directive.
Since the layout for a form is specific to the table we will create a new Form widget by Cloning the existing Form - widget.
Step 1: Navigate to ServicePortal > Widgets > search for widget id "widget-form"
Step 2: Choose option Clone Widget.

Step 3: Provide a new name to the form. Make sure you start the widget name with LBL and end with Table Name.
Naming convention: LBL Form < Table Name >
Widget ID : lbl-form-

Create ng-template:
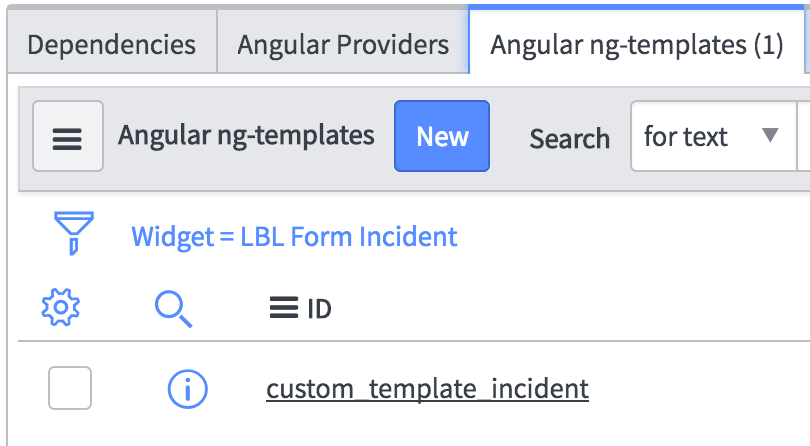
Step 4: Scroll down to the bottom of the Widget to select the tab Angular ng-templates and select New.

Step 4.1: In a different browser tab Navigate to Service Portal > Widgets and Search for lbl-sp-model-xml
Copy the "HTML Template" of the widget which contains the HTML code of OTB sp_model.xml that is used by spModel for rendering the form fields.
Step 5: Paste the HTML Template code as a starting point for customizing the field layout. create a ng-template for a widget which can then be passed to the Extending spModel Directive.

Step 7: Include the ng-template in the widget HTML template
Add following code in the beginning of HTML Template of the new Form-Widget created in Step 3

The Id of the script tag is same as the source name of templateUrl that is provided in the Extended spModel Directive

ServiceNow's spModel Directive is an angularjs Directive. Inorder to extend spModel we need to use the same principles we use to extend an angularjs directive.
by following step 7 we can extend the spModel Directive.
**************************************************************************************************
// argument we pass here to the function is spModelDirective is an array,
// angularJs library interprets spModelDirective as below
// angularJs finds all the directives that has a name spModel and creates and array
// and passes the array to the function as an argument
**************************************************************************************************
function(spModelDirective){
// 3 arguments are passed to angular.extend
// argument 1 : {} and empty object
// argument 2: spModelDirective[0] - since we only have one spModel directive we use first element in the array.
// argument 3: {templateUrl : 'lbl_custom_template.xml'} - the argument that we want to pass to replace the existing attributes value
return angular.extend( {} , spModelDirective[0] , {templateUrl : 'lbl_custom_template.xml'} ) ;
}
breaking down above code:
spModelDirective >> Servicenow directive we want to extend ( spModel +
Directive )
angular.extend >> angular.extend is an angularjs function copies 2
objects
spModelDirective[0] >> argument to angular.extend function. In angularjs
the way to refer to a directive is by joining 2 words spModel and Directive
templateUrl : 'lbl_custom_template.xml' >> new attribute that we update
in the spModel directive
The ng-include is the same name as the ng-template that is created for the widget.
Step 8: Associate the Extended Angular Directive to the Cloned Form-Widget created in Step 3
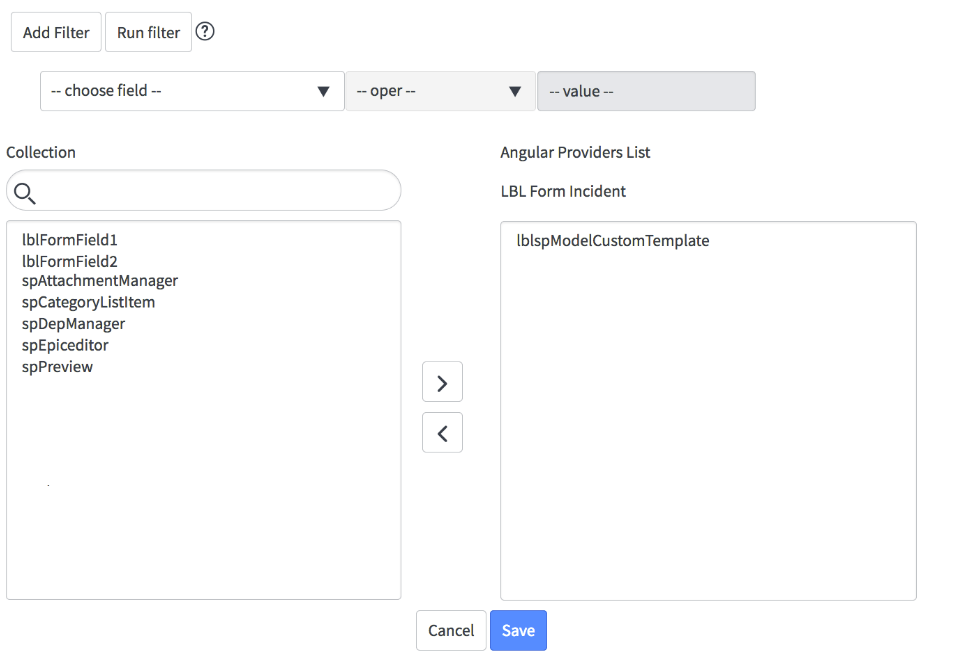
Step 8.1: Scroll to the bottom of the page and select tab - Angular Providers
Step 8.2: Select Edit and choose the Extended Angular Directive
( lblspModelCustomTemplate)
This will provide the ability for the cloned form-widget to use the extended angular directive.

Step 9: Replace the spModel Directive tag to use the new Extended lblspModelCustomTemplate Directive.
Step 9.1: Comment the sp-model tag
Step 9.2: Add new tag lblsp-model-custom-template

https://www.servicenow.com/community/developer-articles/custom-layout-for-sp-model-spmodel-istanbul/ta-p/2303547