
Microsoft SCCM Integration
The Microsoft SCCM integration is a one direction import of SCCM data into the ServiceNow's Configuration Management Database (CMDB).
This article is a supplement to the ServiceNow documentation. For full documentation please see the ServiceNow Documentation
Please note that it is important to try this integration in a development instance first and test the integration before going live in production.

These are the plugins for the currently supported SCCM versions, all of which support Asset Intelligence and Incremental Software Reconciliation:
- Microsoft SCCM 2007
- Microsoft SCCM 2012 v2
- Microsoft SCCM 2016 (also compatible with SCCM version 1702 and 1802).
Once you determine what plugin to install, activate the correct plugin:
- Navigate to System Definition > Plugins.
- Find the plugin with the filter criteria and search bar.
- Activate the plugin.
Step 2: Midserver Installation
In most cases, a mid server is necessary to facilitate the communication between SCCM and ServiceNow.
ServiceNow Documentation on Midserver
Step 3: Create SCCM Account
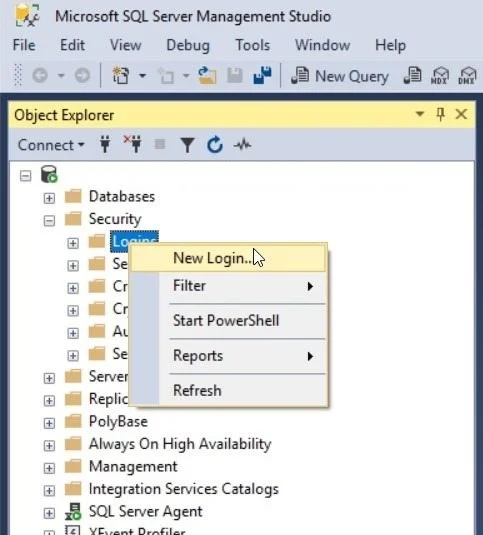
Microsoft SQL Server Management Studio
- Have an SCCM administrator login into SQL Server Management Studio
- Server type: Database Engine
- Server name:
- Server type: Database Engine
- Go to Security > Logins
- Right Click Logins, and Select New Login…
- General Page. SQL Server Authentication: true
- Login name:
Password:
- Enforce password policy: true
- Default Database: User Mapping Page Select SCCM Database Add Database Role: db_datareader Click Ok Navigate to Integration - Microsoft SCCM <version> > Setup. Work with your SCCM admin to complete the required fields to configure connection to the SCCM SQL database. Make sure to include a valid MID Server that has access to the SQL database server. Under Related Links, click Test data source connections to test the connection to the SCCM database. Activate the correct scheduled data imports for your SCCM Integration Computer Identity (Main Import) Navigate to Integration - Microsoft SCCM > Scheduled Import. Select a calendar interval (Day, Week, etc.) in the Run field and specify the time of day the import should run. Select the “Run as” user for the data import. Use your own account if you want to be famous. :) Click Save Child Imports (Common) Configure Child Scheduled Imports. Underneath the Parent “SCCM 2016 Computer Identity” import, there are child imports that run after completion. Deactivate or Activate imports as needed. SCCM 2016 Operating System. This is supplemental import that updates the cmdb_ci_computer table with Operating System information. SCCM 2016 Processor. This is supplemental import that updates the cmdb_ci_computer table with Operating System information. SCCM 2016 Disk. This is supplemental import that updates the cmdb_ci_disk table. For large SCCM databases, sometimes this is turned off due to size. SCCM 2016 Network. This is supplemental import that updates the cmdb_ci_network_adapter table. For large SCCM databases, sometimes this is turned off due to size. Child Imports (Asset Intelligence) Asset Intelligence is an SCCM feature that can filter, normalize and clean up software records. When enabled, it populates normalized software data in a separate table within the SCCM database. You can target this separate table instead of the raw software data table. When you import software records into the CMDB with this feature enabled, you get a cleaner set of software data. If you have AI for SCCM, you’ll need to activate some Scheduled Imports and disable others
- Login name:
Password:
https://www.servicenowelite.com/blog/2019/8/4/microsoft-sccm-integration