
Learn about the new Impact Capabilities Maps self-service features
If you use the Impact Capabilities Map, you already know that your Impact Squad can update it if you want something changed—for example, if you want to change the usage status of a capability from “Not in use” to “Planning.” But now, we’ve introduced new Capabilities Map self-service features in the Washington release, which means you can also update the map yourself. Here are the things you can do:
- Update the usage status of capabilities
- Add notes to capabilities
- Hide and unhide capabilities
- Add your own Store or custom capabilities
Let’s take a deeper look.
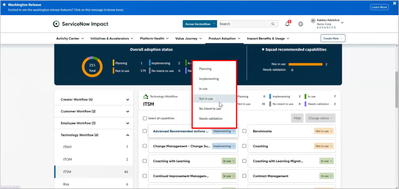
Updating the status of capabilities
You can easily change the usage status of an individual capability, and you can also do bulk updates—changing the status of multiple capabilities in one shot.
To update the status of a single capability, simply click on the usage status to the right of the capability and select the new status you want from the popup list, as shown below.

To change the usage status of multiple capabilities in one shot:
- Select the capabilities you want to change by ticking the checkboxes to the left of the capabilities, as shown below. There’s also a “Select all capabilities” checkbox if you want to choose everything that’s displayed.
- Click the "Change status" button and select the new status from the list. A dialog box will appear asking you to confirm the change. Click "Yes", and the new status is applied to all of the capabilities you selected.

Adding notes to capabilities
You can also easily add notes to capabilities—for instance, how it could help you address a specific business issue, or a reminder to talk to your Impact Squad about the capability the next time you meet with them.
To make a note, click on the capability. You’ll see a flyout with information about the capability, just like you normally do. Click on the “Notes” tab, then click on “Edit”, as shown below.

Now, you’ll see a text editor widget, as shown below. Enter your note, and press “Save”. You can come back and update your note at any time, and your Impact Squad can also see and edit your note.

Hiding and unhiding capabilities
You can also hide capabilities so they are not displayed in your main capabilities map view. This is useful if there are capabilities you’re not interested in. For example, you might want to hide some of the capabilities that have a usage status of “No intent to use” because you know you’ll never use them, while keeping others unhidden because you’re not completely sure yet.
To hide capabilities, select them in the capabilities list by checking the box to the left of each capability (or choose all displayed capabilities by checking “Select all capabilities”). Then, press the “Hide” button, as shown below. You’ll get a confirmation dialog, and once you confirm, the capabilities will be hidden.

If you change your mind, you can easily unhide capabilities again. There’s a new “Show hidden” filter at the top of the Capabilities Map (see below) that lets you display hidden capabilities. Set it to “Yes” so only hidden capabilities are displayed.

At this point, the “Hide” button will also change to “Unhide”. Select the hidden capabilities you want to unhide, press the “Unhide” button, and confirm. The selected capabilities are now displayed again in your main capabilities map.

Adding your own manual capabilities
While the Capabilities Map provides a comprehensive list of capabilities for all ServiceNow solutions, you can also add new capabilities to these. For instance, if you’ve built a custom app, you can include capabilities for this in the map.
To add a capability, click on the “Add manual capability” button (it’s above the black status bar on the right-hand side). An “Add capability” form will appear as shown below. Fill it in, and click save. You can now manage this capability just like any other capability.

If you want to make edits to a manual capability that you’ve already added, simply click on the capability. You’ll see the information flyout for the capability appear as usual. However, for manual capabilities, there’s an additional green “Edit capability” button. Click on this to edit the capability.
Note that manual capabilities are shaded gray in the capabilities list and have the word “Custom” under the application name. In fact, we’ve shaded all unlicensed capabilities gray (including manual capabilities) to make them easier for you to see.
Ready to take full control of your Capabilities Map? Try out the new self-service features! Update statuses, add notes, hide or unhide capabilities, and even add your own custom capabilities with ease. Start exploring these new features now and streamline your capability management like never before!
Get started now and make the most out of your Impact Capabilities Map!
https://www.servicenow.com/community/servicenow-impact-articles/learn-about-the-new-impact-capabilities-maps-self-service/ta-p/3008404