
Practical UIB Examples: Prevent Record Submission without Attachments
In many business scenarios, it's crucial to ensure that records submitted through a form have all the necessary attachments. This can prevent incomplete or invalid submissions that might lead to delays and additional follow-up work.
There are two common variations of this requirement:
- Specific Categories of Files: Some forms may require specific categories of files to be attached before submission. For instance, a Travel Expense form might need a receipt for airfare and another for lodging. In such cases, dedicated properties should be used to store each attachment instead of using the attachment component. You would add two fields of type File Attachment and make them mandatory.
- At Least One File Attached: In other scenarios, the form only needs to ensure that at least one file is attached, and the type of file does not matter.
This article presents a way to support the second scenario, ensuring that a record has at least one attachment before submission. Here’s how to achieve this in ServiceNow UI Builder.
Step-by-Step Guide
Overview
To address this need, we'll use the events triggered by the attachment component whenever users add or remove an attachment. These events will help us keep track of the number of files attached, and we will use this information to control whether the submit button is enabled or disabled. Essentially, we'll enable the submit button whenever at least one file is attached.
Step 1: Set Up the page
Set up a page with the following components:
- A form component
- A attachment component
- And a submit button

.
Step 2: Configure Client State Parameters
To manage the state of the submit button, you'll need client state parameters that will be updated based on the attachment events.
- Add the
hasAttachmentsClient State Parameter:
- Go to the "Client State Parameters" section in UI Builder.
- Add a new client state parameter named
hasAttachmentsand set its initial value tofalse.
- Go to the "Client State Parameters" section in UI Builder.
- Add the
attachmentCountClient State Parameter:
- Go to the "Client State Parameters" section in UI Builder.
- Add another client state parameter named
attachmentCountand set its initial value to0.
- Go to the "Client State Parameters" section in UI Builder.

Step 3: Map Events to Scripts
We'll now create scripts that update the client state parameters based on the attachment events, and then map these events to the scripts.
- Create a Client Script for "Attachment upload succeeded":
- In the script editor, write a script to update the client state parameter
attachmentCountand sethasAttachmentstotrueif there is at least one attachment. Here is the script: - Name: Handle Attachment upload
- Script:
function handler({api, event, helpers, imports}) { const newCount = api.state.attachmentCount + 1; api.setState('attachmentCount', newCount); api.setState('hasAttachments', newCount > 0); }
- In the script editor, write a script to update the client state parameter
- Create a Client Script for "Attachment delete succeeded":
- Write a script to decrement the
attachmentCountand updatehasAttachmentsaccordingly. - Name: Handle Attachment Delete
- Script:
function handler({api, event, helpers, imports}) { const newCount = api.state.attachmentCount - 1; api.setState('attachmentCount', newCount); api.setState('hasAttachments', newCount > 0); }
- Write a script to decrement the
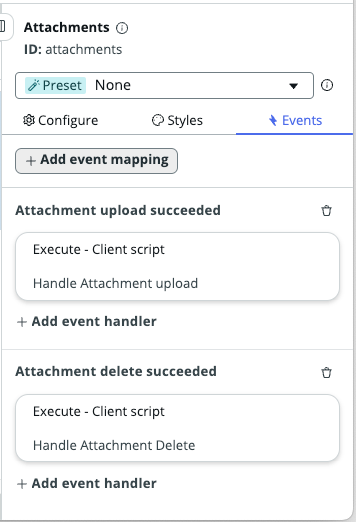
- Map the "Attachment upload succeeded" Event:
- Select the attachment component.
- Go to the "Events" section.
- Click on " + Add event mapping"
- Find the
Attachment upload succeededevent. - Map this event to the
Handle Attachment Uploadclient script. - Click Add.
- Select the attachment component.
- Map the "Attachment delete succeeded" Event:
- Similarly, find the
Attachment delete succeededevent in the attachment component. - Map this event to the
Handle Attachment Deleteclient script. - Click Add.
- Similarly, find the

Step 4: Bind the State Parameter to the Submit Button
Finally, we'll bind the client state parameter to the disabled property of the submit button to ensure it is only enabled when there are attachments.
- Select the Submit Button Component
- Go to the properties panel.
- Find the
disabledproperty. - Click the Bind icon
- Select script and set the script to return
trueif there are no attachments, effectively disabling the submit button, andfalseotherwise. Here is the simple script:
function evaluateProperty({api, helpers}) { return ! api.state.hasAttachments; } - Click Apply.
Step 5: Test Your Configuration
See that it's working as expected.
- Open the page: Notice that the submit button is disabled by default
- Upload an Attachment: See how the submit button becomes enabled when an attachment is uploaded.

Labels:

https://www.servicenow.com/community/next-experience-articles/practical-uib-examples-prevent-record-submission-without/ta-p/2959821