
Configuring L2 Menu in Project Workspace
Introduction:
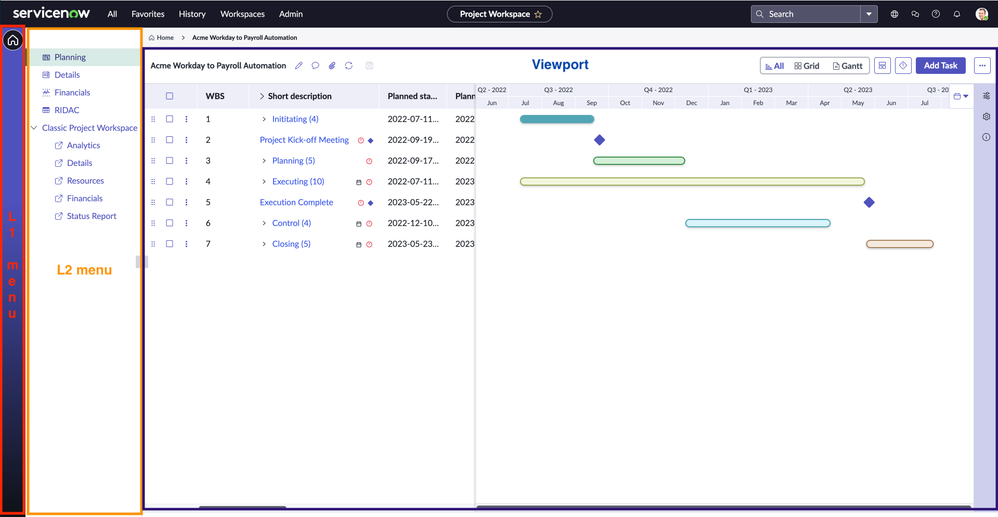
Project Workspace UIB features a viewport. Within this viewport, subpages such as Planning, Details, RIDAC, and Financials are loaded. Each L2 menu on the left section of the page corresponds to an individual subpage. Clicking a menu triggers the loading of the respective subpage onto the viewport.

Adding Custom L2 Menu Items:
Adding custom L2 menu items is a seamless process. To insert a custom menu above the "Classic Project Workspace" items, follow these steps:
- Script Include Customization:
- getPlannerSubPageItems method in ProjectWorkspaceHelperSNC SI gets called to fetch these menu items. So we have to override/create the similar method in ProjectWorkspaceHelper SI, ensuring the preservation of OOB options while adding the custom menu item. Specify the order attribute to define its position.
- Below is the code example that adds “custom” menu item.
getPlannerSubPageItems(projectId, sysClassName) {
const plannerSubPageItems = [];
const planningItem = {
   id: "planning",
   label: gs.getMessage("Planning"),
   route: "planning",
   icon: "Roadmap Fill",
   order: 1
};
plannerSubPageItems.push(planningItem);
const hasPPMFinanceReadRole = gs.getUser().hasRole('sn_ppm_finance_read');
const hasProjectManagerRole = gs.getUser().hasRole('project_manager');
const hasProgramManagerRole = gs.getUser().hasRole('program_manager');
if (hasPPMFinanceReadRole || hasProjectManagerRole || hasProgramManagerRole) {
   const finacilasItem = {
       id: "pw-financials",
       label: gs.getMessage("Financials"),
       route: "pw-financials",
       icon: "Chart Control Fill",
       order: 3
   };
   plannerSubPageItems.push(finacilasItem);
}
const ridacItem = {
   id: "ridac-monitor",
   label: gs.getMessage("RIDAC"),
   route: "ridac-monitor",
   icon: "Table Fill",
   order: 4
};
plannerSubPageItems.push(ridacItem);
const detailsPage = { //record page
   id: "details",
   label: gs.getMessage("Details"),
   route: "details",
   icon: "Form fill",
   fields: {
       table: sysClassName,
       sysId: projectId
   },
   order: 2
};
/***** Adding a custom menu - code - starts here ******/
const customMenu = {
   id: "custom",
   label: gs.getMessage("Custom"),
   route: "custom",
   icon: "Form fill",
   order: 5 //Use this order to control the placement of L2 menu option.
};
plannerSubPageItems.push(customMenu);
/***** Adding a custom menu - code - ends here ******/
plannerSubPageItems.push(detailsPage);
plannerSubPageItems.sort((a,b) => a.order - b.order);
return {
   plannerSubPageItems,
   defaultPage: planningItem
};
}
- getPlannerSubPageItems method in ProjectWorkspaceHelperSNC SI gets called to fetch these menu items. So we have to override/create the similar method in ProjectWorkspaceHelper SI, ensuring the preservation of OOB options while adding the custom menu item. Specify the order attribute to define its position.
- UIB Configuration:
- Confirm that the relevant individual subpage is created in UIB under the "viewport_uld" in the "planner" page within Project Workspace.
- Page Creation:
- Create a page with the specified route ("custom") based on the route definition in the ProjectWorkspaceHelper SI

- Custom Page Attributes:
1. If the custom option requires explicit fields and parameters, create a custom page similar to the "details" page.
By following these steps, clicking the custom menu in the L2 section will automatically render the new custom page.
Adding Custom L2 Menu under "Classic Project Workspace" menu:
To add a custom L2 menu under the "Classic Project Workspace" menu, the process involves:
- Script Include Method:
- Use the getClassicWorkspaceItems method in the ProjectWorkspaceHelperSNC SI.
- Override this method in ProjectWorkspaceHelper SI, maintaining OOB options while adding the custom menu item. Specify the order and URL attributes for proper placement and link definition.
- These are the kind of options that will get opened up in browser new tab with the URL mentioned in the option. For these type of menu items we no need to create sub-page in UIB.
- Example:
getClassicWorkspaceItems(projectId, sysClassName) {
// ... (Preserve Existing code)
/***** Adding custom menu code - Starts Here *******/
const customMenu = {
   id: "custom",
   label: gs.getMessage("Custom"),
   order: 5,
   url: "https://example.com/custom"
};
classicWorkspaceItems.push(customMenu);
/***** Adding custom menu code - Ends Here *******/
// ... (Preserve Remaining code)
}
- Use the getClassicWorkspaceItems method in the ProjectWorkspaceHelperSNC SI.
Removing custom L2 menu options:
To remove the L2 menu item under “Classic Project Workspace” (Menu's that navigate to Classic Project Workspace), while overriding the “getClassicWorkspaceItems” method in “ProjectWorkspaceHelper” SI – Make sure you comment out the option that is either declared in classicWorkspaceItems arrayList or pushed into the classicWorkspaceItems arrayList*.*
To remove the L2 menu item above the “Classic Project Workspace” menu (Menu's for New Project Workspace), while overriding the “getPlannerSubPageItems” method in the “ProjectWorkspaceHelper” SI - Make sure you comment out the option that is either declared in plannerSubPageItems arrayList or pushed into the plannerSubPageItems arrayList.
How to hide/show L2 menu on a page in Project Workspace:
- Experiences -> Project Workspace -> "UX Page Properties" related list
- Find the property with name "subToolbar"
- Update the "hideSubToolbar" property in the value with page name or page route
- To hide L2 menu in a page, add page name to the "hideSubToolbar" list.
- To show L2 menu in a page, remove page name from the list.
- To hide L2 menu in a page, add page name to the "hideSubToolbar" list.
OOB, hideSubToolbar will have the "home" page as we are hiding L2 menu in the home page (Page which displays project cards). All the other existing main pages or newly created main page by default will have L2 menu. You should follow the above steps to hide/show L2 menu in the existing or newly created/customised pages.
Labels:

https://www.servicenow.com/community/spm-articles/configuring-custom-l2-menu-s-in-project-workspace/ta-p/2848374