
Configure User Autoprovisioning in OIDC Single Sign On (SSO) in servicenow
This article will walk you through how we can configure User Auto-provisioning in OIDC SSO. These same steps can be followed for configuring user auto-provisioning for any OIDC identity providers like Okta, Azure etc.
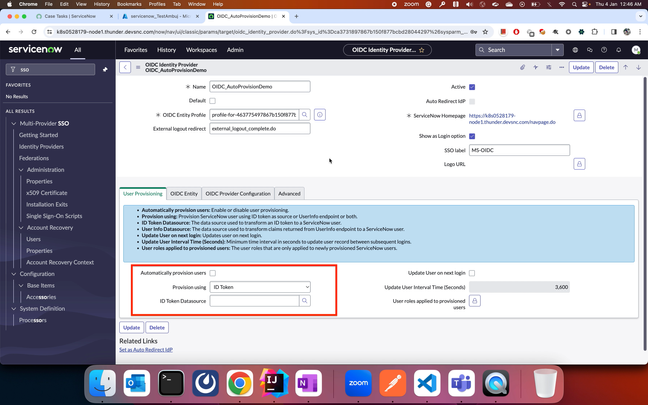
1: Configure the OIDC SSO Record and make sure the login is working successfully with any existing user. User provisioning is not yet enabled.

2: Configure Auto provisioning by creating (or selecting the existing) data source corresponding to the provision method selected (ID Token/Userinfo/Both). In this example, I am using ID Token Data source.

3: If you are creating the new data source and with a new table, this table will not have any columns and you dont have to add any columns in it either. This table will be auto created after first login attempt. If you are using the existing table, you can go ahead and create the transform map using the existing columns. Make sure the columns you map are correct columns which are present in the ID Token/Userinfo response.

Here, since I have created a new table, this doesn't exist yet.

4: Login with any external user which is not present in the servicenow. This login attempt will fail with the below errors.
- Transform map record not provided, transform stopped
- TransformMapId is null, Skip adding transform entry.: no thrown error
Now, the above table demo_user_table1 will be automatically created with the required columns.

5: Now the transform map will have the option to map the fields from the source table (demo_user_table1) to the target table (sys_user) in this case. Map the fields that are required to be mapped in the transform map.

The data corresponding to the each column in both source and target tables can be seen in the data viewer section. This can be helpful to avoid incorrect mapping of columns from both the tables.
6: Save the Tranform map record after the mapping is done and login with the user.

Now the login should be successful with the external user which is not present in the servicenow and that user should also be created in the target table (sys_user).
Also the data source table (demo_user_table1) should contain a new entry for the above transformed record which got created after user login.

Thank you.
https://www.servicenow.com/community/community-resources/configure-user-autoprovisioning-in-oidc-single-sign-on-sso-in/ta-p/2779595