
SharePoint API and Postman
2 minute read
I had a need to post data from a ServiceNow Request Item to a SharePoint List. To accomplish this I needed to understand the REST API options for SharePoint. There are a couple of options:
While Microsoft does steer you in the direction of graph, it seems to have a few limitations still. Most notably, you cannot set read/write permission on the site or list level. It’s all or nothing! For that reason we’ll stick with the tried and true API until Microsoft is able to achive parity. Lets’s get started.
Create a new client id and key, aka Register Add-In
Alternatively this can be done in Azure Portal.
- Open the the appregnew.aspx link on you SharePoint site for example: https:/mycompany.sharepoint.com/teams/myteam/_layouts/15/appregnew.aspx
- Generate new id/secret and click create
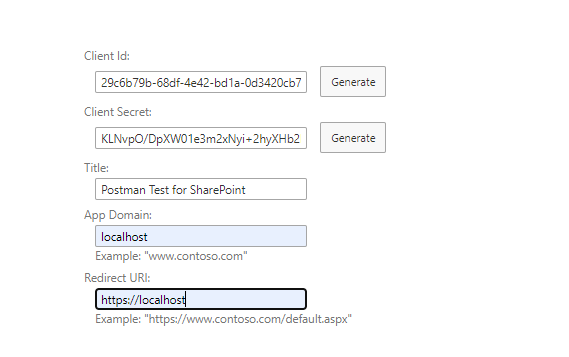
- Record the values and save for later
Grant permissions to new client id, aka Add-In
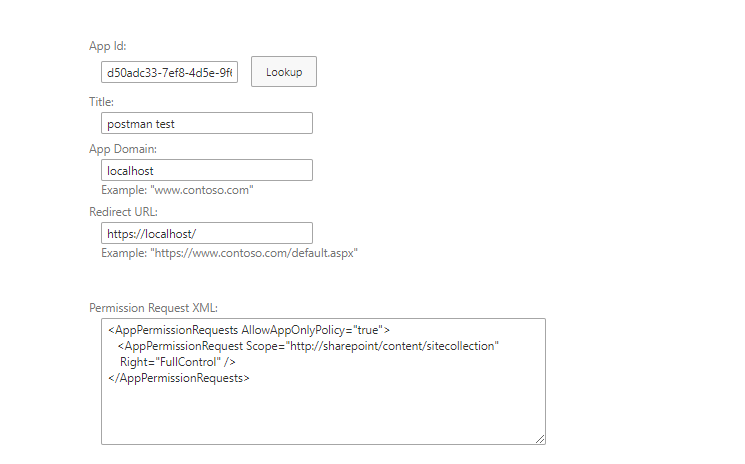
- Open the the appinv.aspx link on you SharePoint site for example: https:/mycompany.sharepoint.com/teams/myteam/_layouts/15/appinv.aspx
- Copy in your Client ID that was registered and click lookup
- Add in the following xml to grant full permission to this Client ID
<AppPermissionRequests AllowAppOnlyPolicy="true">
   <AppPermissionRequest Scope="http://sharepoint/content/sitecollection"
    Right="FullControl" />
</AppPermissionRequests>
Example:
To review these at any time
https:/mycompany.sharepoint.com/teams/myteam/_layouts/15/appprincipals.aspx
For more info from Microsoft see Granting access using SharePoint App-Only and Add-in permissions in SharePoint
Configure Postman Authentication
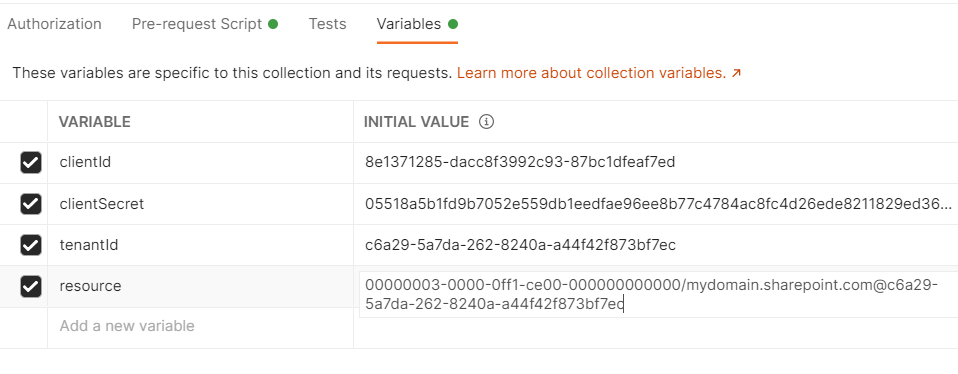
Configure Postman to connect using the new client id and key. Before you begin you’ll need the following information.
| Variable: | Value |
|---|---|
| Client Id: | (client secret) |
| Client Secret: | (client secret) |
| tenantId: | (azure tennant id) |
| resource: | 00000003-0000-0ff1-ce00-000000000000/mydomain.sharepoint.com@tennantid |
- In post click new and create a new “Collection”
- Fill in the variables. It should look similar to this. (don’t worry, these aren’t real values)
- In the pre-request script tab use the script below:
pm.sendRequest({
url: 'https://accounts.accesscontrol.windows.net/' + pm.variables.get("tenantId") + '/tokens/OAuth/2',
method: 'POST',
header: 'Content-Type: application/x-www-form-urlencoded',
body: {
 mode: 'urlencoded',
 urlencoded: [
     {key: "grant_type", value: "client_credentials", disabled: false},
     {key: "client_id", value: pm.variables.get("clientId") + '@' + pm.variables.get("tenantId"), disabled: false},
     {key: "client_secret", value: pm.variables.get("clientSecret"), disabled: false},
     {key: "resource", value: pm.variables.get("resource"), disabled: false}
 ]
}
}, function (err, res) {
pm.globals.set("bearerToken", res.json().access_token);
});
Query all lists
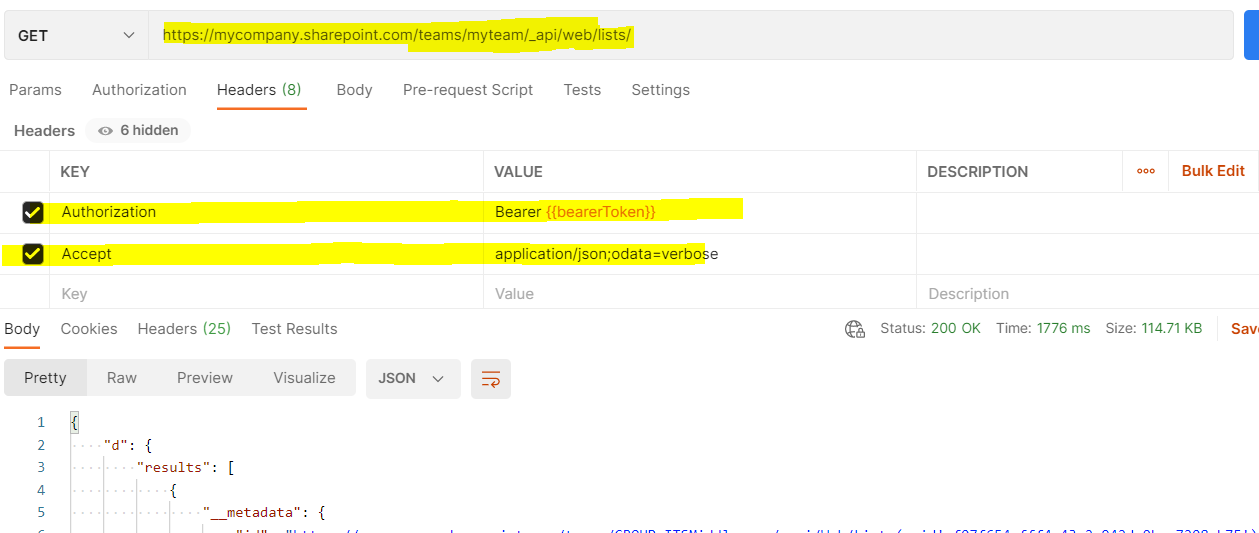
- Right click the header of the collection and choose “Add request”
- Add the following header values under the headers tab
| HeaderKey: | Value |
| ------------- | ------------------------------ |
| Authorization | Bearer |
| Accept | application/json;odata=verbose | - Set the type to get and the value to https://mycompany.sharepoint.com/teams/myteam/\_api/web/lists/
- Click send. Sample result:
It’s tricky to go in to detail since every list is different but here is a primer.
- I have a list titled “Asset Manager”
- I want to add a new item to this list
- Right click the header of the collection and choose “Add request”
- Add the following header values under the headers tab
| HeaderKey: | Value |
| ------------- | ------------------------------ |
| Authorization | Bearer |
| Accept | application/json;odata=verbose |
| Content-Type | application/json;odata=verbose | - Set the type to POST and the value to https://mycompany.sharepoint.com/teams/myteam/api/web/lists/GetByTitle(‘Asset manager’)/items
- Set the body to the code snippet below
{ "__metadata": { "type": "SP.Data.Asset_x0020_managerListItem" }, "Title": "my test item" } - Click send. Sample result:
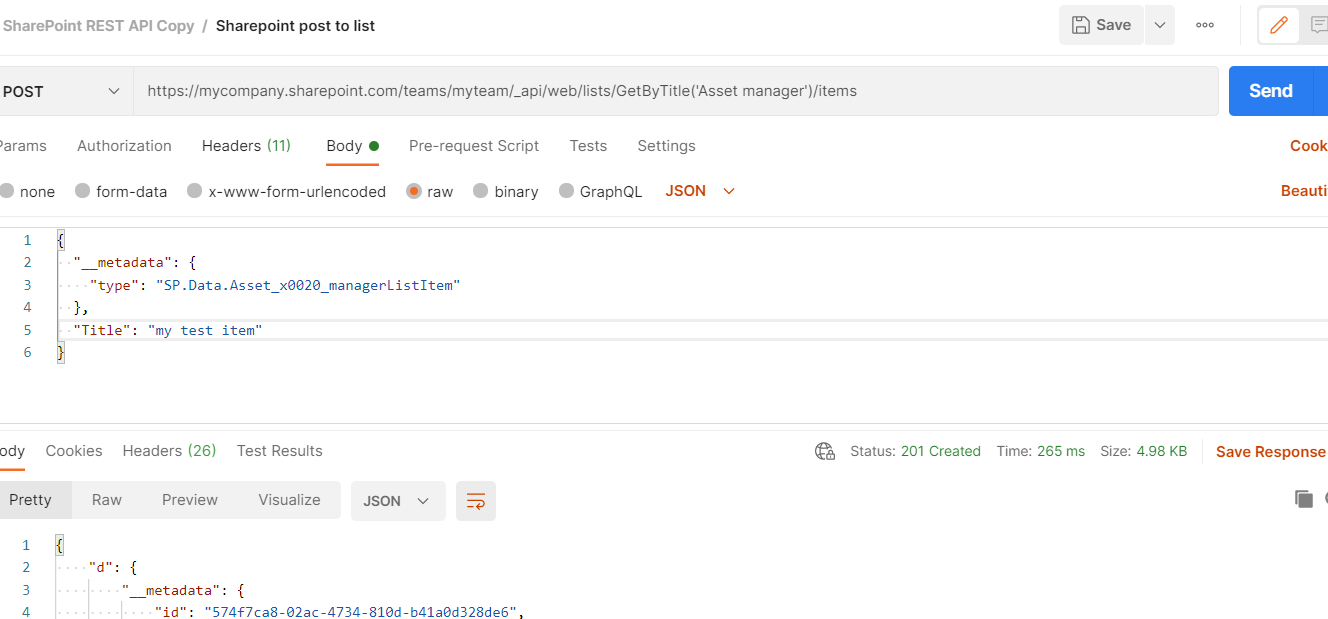
As expected, the new item is in the SharePoint List!
Bonus
If you need to remove the app registration, you can use the Azure Portal or PowerShell. Sample script
#first install the module and connect
Install-Module MSOnline
Connect-MsolService

#then find and remove
Get-MsolServicePrincipal -ServicePrincipalName <client id>
$appPrincipal = Get-MsolServicePrincipal -ServicePrincipalName <client id>
Remove-MsolServicePrincipal -ObjectId $appPrincipal.ObjectId
Updated: February 28, 2021
https://mtcoffee.github.io/sharepoint-api-and-postman/