
Practical UIB Examples: The Comparator Component
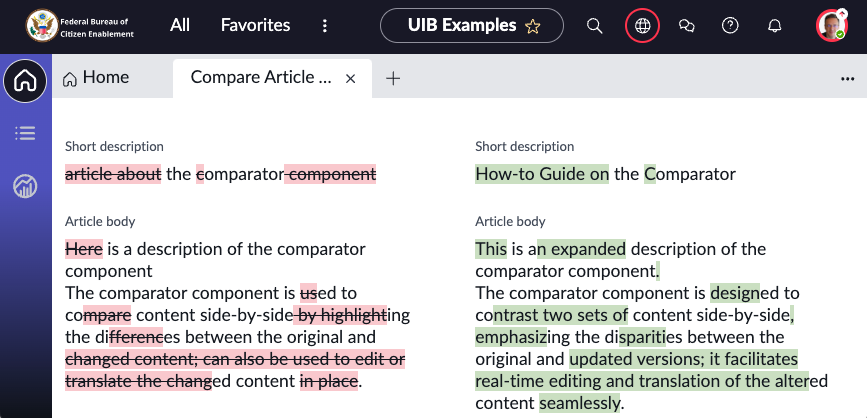
The Comparator component allows to compare content side-by-side by highlighting the differences between the original and changed content. It can also be used to edit or translate the changed content in place.

To illustrate the component what’s not better than to leverage the ServiceNow knowledge base? So, to get started I created an article and edited it to have 3 versions.

Next, we'll create a page.
Create a page.
If you already have a page open, skip this section and go directly to the section Configure the comparator component
In App Engine Studio, open your experience (workspace or portal) and click "Open in UI Builder"

In the UI Builder view, click the name of your experience to open the Experience Overview.

Note: The view might look slightly different based on your ServiceNow version but the concepts are the same.
Then click the (+) icon to create a new page.

Then, click on "Create from scratch instead"

1) Give the page the name: “Compare Article Versions” and 2) Click Continue

Next up, we want our page to display comparisons between different article versions—and not just for one article, but any article. So, to make this possible we'll add a page parameter that will allow us to specify which record to open when the page is rendered.
① Click Add,
② Set the parameter's name to "kbNumber",
③ Click "Looks good"

Next, we'll accept the Default variant, Click Create at the bottom of the page.

To make the most of UI Builder's real-time WYSIWYG preview capabilities, let's set up a test value for our page parameter. This will allow us to preview what the page will look like as we build it.
① Click the page parameter
② Set the value to your kb number
③ Click Apply

Now, we're ready to...
Configure the comparator component
Add the component to the page.

Set the Data the component expects
Each component comes pre-configured with static data to get a preview of the end result. Let’s inspect that.
Go to the Config panel on the right, and Click on Edit on the Comparison data.

The comparison data is shown as an array of objects. Initially, the static data format wasn't immediately clear to me, so I went to check the documentation of the component. Go check it out, it really helps in understand ing how to component works. In short, each item in the list corresponds to an element in your record that you wish to compare using the comparator component.

Now, with a clearer understanding of the required data format, the next step is transforming our data into this format. We have a knowledge article that needs to be adapted to match the component’s format requirements. In the Next Experience framework, the go-to tool for this task is the Data Resource.
Create the Data Resource
What Are Data Resources? Data Resources define what data to fetch for a page's components. Using Data Resources decouples data fetching from hard-coded component configuration. Fetching data dynamically makes components reusable across pages and experiences as long as both the experience and user have access to the data.
Click the Data icon

Then click the + Add button in the Data resource instances section.
Select the type “Transform” for the new Data Resource.

This opens a new window to create the Data Broker Server Script.
NOTE: The term D ata Broker is another name for a Data Resource.
Give it a name: getKBChangedContent
A description: Returns the changes made between two versions of a Knowledge Base (KB) article
The properties are the input for the Data Broker, similar to how parameters work in a function. We’re looking to compare two versions of a knowledge article, so we need to set three properties: 'kb_number', 'version_1', and 'version_2'."
[
  {
    "name": "kb_number",
    "label": "KB Number",
    "description": "Number of the Knowledge Base (KB) article",
    "readOnly": false,
    "fieldType": "string",
    "mandatory": true,
    "defaultValue": ""
  },
  {
    "name": "version_1",
    "label": "Version 1",
    "description": "the initial version of the KB article to be compared",
    "readOnly": false,
    "fieldType": "string",
    "mandatory": true,
    "defaultValue": ""
  },
  {
    "name": "version_2",
    "label": "Version 2",
    "description": "the subsequent version of the KB article for comparison.",
    "readOnly": false,
    "fieldType": "string",
    "mandatory": true,
    "defaultValue": ""
  }
]
and for the Script, copy the following:
function transform(input) {

    var kb_number = input.kb_number;
    var version_1 = input.version_1;
    var version_2 = input.version_2;

    var kb_record = new GlideRecord('kb_knowledge');
    kb_record.addQuery('number', kb_number);
    kb_record.addEncodedQuery(`number=${kb_number}^version.version=${version_1}^ORversion.version=${version_2}`);
    kb_record.orderBy('sys_created_on');
    kb_record.query();

    var results = [];

    if (kb_record.next()) {
        var originalContent = {
            short_description: kb_record.short_description + "",
            text: kb_record.text + ""
        };

        kb_record.next();

        var changedContent = {
            short_description: kb_record.short_description + "",
            text: kb_record.text + ""
        };

        results.push({
            changedContent: changedContent.short_description,
            contentType: "string",
            heading: "Short description",
            name: "short_description",
            originalContent: originalContent.short_description
        });

        results.push({
            changedContent: changedContent.text,
            contentType: "html",
            heading: "Article body",
            name: "text",
            originalContent: originalContent.text
        });
    }

    return results;
}
Click Submit.
Now, let's add the data resource to our page.
Go back to the page "Compare Article Versions”
Note: In versions prior to Vancouver, after adding a new data resource, a notification prompts you to refresh the page to make that resource available for use. Starting with the Vancouver version, this step has been streamlined; the data resource becomes automatically available without the need for a page refresh.
① Click the + Add button
② In the search field, type "getkb" (or the name of your data transform)
③ Select the transform
④ Click Add

Next, UI Builder is going to display a message saying: You don’t have permission to select this data resource. Contact your admin for more information.

| Note: In ServiceNow, security takes the front seat. This means that not everyone has the green light to execute queries, especially those that could potentially be a risk in terms of performance and security. So, what’s the next step? It's time to either step into the admin role ourselves or touch base with the admin team to secure the necessary permissions to run this data transform. |
|---|
With our admin hat on, we’ll follow these steps:
① Select the data resource
② Click on Open record

This opens the data transform page,
① Right-click on the record header
② Click on Copy sys_id

Next, elevate your role to security admin by following the steps below:
① Click the user profile icon in the header
② Click on Elevate role
③ Check the box security_admin
④ Click Update

Create an Access Control
① Click All
② Type Access control
③ Click on Access control (ACL)

Click New to create a new ACL record and set the following
① Type : UX Data Broker
② Operation: execute
③ Name: paste the sys_id of the data transform you copied earlier (if the Name field appears as a drop down , click the blue right triangle ▸, to change the mode of the field to Text field)
④ Click the Submit button

Go back to the page "Compare Article Versions” and
① Switch the setting for When to evaluate this data resource back and forth to refresh the Data Resource.
② You will see the error disappear and the data resource returns an empty list "[]"

Let's pass real values to the data resource:
① set the KB number
② "1.0" for the first version
③ "2.0" for the second version
④ See the data resource successfully returning data

Pass dynamic data to the Component
Now we can configure the component to make it display data about our kb article.
To do that:
① Select the component in the page outline panel
② In the component config panel, click the "Data" icon
③ Type "@data" then "." (dot), then the name of your data resource (here: getkbchangedcontent_1) then "." (dot), then "output"
④ And voila, the component now displays data from your record.

Click Save, open the page and you should see the final result.

From there the sky is the limit. For example, we can add two Dropdown components to allow users to select which version to compare.

https://www.servicenow.com/community/next-experience-articles/practical-uib-examples-the-comparator-component/ta-p/2693292