
Recurring Campaigns
 Susan Britt
There are times where you need to setup a recurring campaign, similar to a recurring calendar invite. Some common use cases are to recognize work anniversaries or employees on their birthdays. Since Campaigns allow you to create many forms of content (e.g., banner announcements, events, notifications, actionable items/to-dos), they are the perfect way to dynamically send the recognition to your employees.
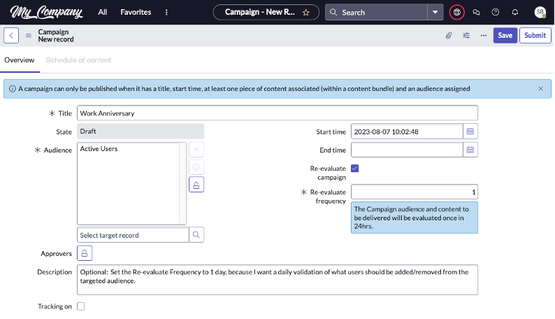
In the below example, we will create a Work Anniversary Campaign that will add an announcement to the portal homepage 5 days before through 5 days after the employee’s anniversary date.
High-level Steps to create a campaign there are roughly 8 steps that need to take place:
- Plan the Campaign
- Gather requirements
- Create the Campaign
- Create the Campaign Stage(s)
- Create the Content record(s)
- Add Content to Campaign
- Publish the Campaign
- Run Scheduled Jobs
Plan
Planning out the campaign is an essential part of the process, and it includes thinking through the purpose of this campaign. Below are some common questions to be prepared to ask/get answers to when gathering requirements from the stakeholders/process owners around the Campaign.
- What type of information do you want to communicate? (e.g., open enrollment, upcoming training)
- What specific information and format do you want to send? (e.g., video on how to enroll, link to the benefits provider site, event for benefits plan overview by location)
- Where should content appear? (e.g., Upcoming Events widget, My Tasks)
- Who should be included in the campaign? (e.g., all full-time employees, managers only)
- When do we want to communicate?
Gather Requirements
To properly configure Campaigns, certainly larger ones like Open Enrollment or New Hire Onboarding, you will need to meet with the appropriate process owner/stakeholders to gather all the requirements to complete the configuration of the Campaign, Campaign Stages, and Content. The ServiceNow Docs can step you through those options.
Create the Campaign
- Navigate to Content Experiences Builder
- Select “New”
- Populate the fields as needed (see the docs for explanation of all the fields, if needed)
- Save (now the related lists/tabs will appear at the bottom)

Create the Campaign Stage
The Campaign Stage was formerly called Bundle, so you will see both names in different places.
- Select “New”
- If you are still in the Campaign, select “New” on the Campaign Bundles tab
- If you are not in the Campaign, navigate to Content Experiences > Content Stages to select “New”
- If you are still in the Campaign, select “New” on the Campaign Bundles tab
- Populate the fields as needed
- Submit

Create the Content
If you already have existing content created, you can skip to the Add Content to Campaign section.
For our example, we will be creating an announcement in the Content Experiences widget on the Employee Center Pro homepage.
- Navigate to Content Publishing > Content Library
- Select “New”
- Select the appropriate Platform and Format (e.g., Portal, Styled Content)
- Select “Continue”
- The next steps for creating the content will vary based on the platform and format.
- Complete the content creation, as desired
- "Save"


Note: There is no need to publish the content from here, since it will be added via the Campaign.
Add Content to Campaign
- Navigate to Content Experiences Builder
- Open the Campaign
- Select the “Schedule of content” tab
- Find the existing content by either:
- Search for the name in the filter box
- Expand the appropriate content type section to find the desired content
- Search for the name in the filter box
- Select the plus sign icon beside the appropriate content
- Select the Stage to add the content to
- This could open an additional window to complete, based on the type of content.
- From the “Campaign Content” window, select the portal/EC page and Widget instance for this content to appear.
- If you do not see any available Widget Instances for your content, the Content Type of the content doesn’t align to any widget on the select page. Schedule Content > Content Types records show which content types can be used on which widgets.
- "Submit"
- This should add the content to the Stage


Publish the Campaign
Once the campaign has a stage and content, it is ready to be published.
- Navigate to Content Experiences Builder
- Open the appropriate Campaign
- Select “Publish”
Run Scheduled Jobs
Once the Campaign is published, the scheduled jobs will run to add the Campaign Targets, content, etc.
You can manually run the job(s), if you have access, to prevent waiting on the configured recurring times.
Below are the scheduled jobs and baseline setting on how often it runs and when.


Some assumptions made for this article:
- Campaigns (Content Experiences) are understood
- HRSD SKU is owned
- ECP, Content Publishing and Content Experiences are already activated/implemented
- Employment Start Date is populated on the HR Profile
- You have the appropriate access to complete the steps
https://www.servicenow.com/community/hrsd-articles/recurring-campaigns/ta-p/2648833