
Data privacy / anonymization in practice
It goes without saying that when a new ServiceNow product is implemented (configured) or an existing one is improved / enhanced for customers, development happens on a non-production environment. The bug fixes also should be done on this environment.
Hundreds of regulations describe how to protect data based on their type. Customers want to stay compliant, so they have to take care of this area carefully.
There are a lot of activities (feature improvements, bug investigations), which are difficult or almost impossible without having the proper and / or well structured data content on the sub-production environment.
Long story short, the sensitive data can be available only on production environment in processable format.
Almost all (or all) service providers have already encountered such a demand from customers, that data have to be masked on the non-prod instance after some specific operations, like back-cloning, or 3rd party interface data collection. I'm sure that there are a lot of custom solutions for this problem, like post back-cloning scripts, Fix scripts, or just simple script includes which are responsible for data protection on sub-production instances.
In this article I will introduce a solution to this problem, with the help of out-of-the-box ServiceNow features.
ServiceNow Vault
ServiceNow has a product, which is called ServiceNow Vault. This product consist of several security related solutions, like, Platform encryption, Data anonymization, Secret management or Code signing.
These capabilities give high level data protection for customers, which is expected by authorities.
Data Anonymization
Data Anonymization gives the possibility to mask data on a specific environment and make it impossible to process or be accessed by unauthorised users. In order to be able to do feature implementations or bug fixing, the non-production environment must have data in the database, but sensitive information should be concealed.
The following part of the article is going to describe how it can be configured, used and also highlights its limitations.
So let's get started!
Data classification
In order to use this feature, data has to be classified. Only classified fields can be anonymized. Data classification is a simple process in ServiceNow (it is enabled by default), which gives another layer of categorization or grouping possibilities.
There is a new, user friendly front-end (coming with Tokyo release) which can be used to configure the data privacy settings in the system. This layout cannot be accessed without having the necessary role(s).
Roles
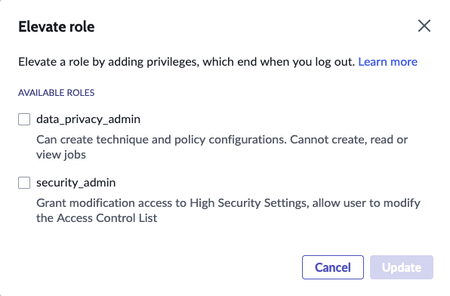
The Data Privacy application gives a security layer to the data. The functionality related to this can be accessed with elevated roles.
There are four roles related to the Data privacy application:
- data_privacy_admin
- Can create technique and policy configurations. Cannot create, read or view jobs
- data_privacy_auditor
- data_privacy_clone_processor
- Can create / modify / remove jobs, related to dataclass-based policies
- data_privacy_processor
- Cancreate / modify / remove jobs, related to user-based policies
If a user has the data_privacy_admin role, one new element appears on the Elevate role modal window.

Configure Data Anonymization
The main configuration page is split into three parts:
- Overview
- It gives an overall picture about the classified data based on some charts and also contains information about the purpose of data classification / anonymization.

- Classification
- This is a simplified layout where the classification actions can be done

- Anonymization
- This is the workbench of data anonymization. There are three actions which can be done on this layout:
- Check / manage anonymization techniques
- Manage anonymization policies
- Manage jobs
- Check / manage anonymization techniques
- This is the workbench of data anonymization. There are three actions which can be done on this layout:

Anonymization techniques
There are five predefined techniques (methods), which defines how the data will be masked:
- Selective Replace
- It can be defined which character(s) of a string will be replaced to a specific one.
- Static Replace
- The content of the field will be replaced to the specified string.
- Random Replace
- Random characters will be used during the string replacement operation.
- Remove
- This technique removes the content of field(s).
- No action
- This technique doesn't do any actions on the content of field(s). This action can be useful if a specific field has to be bypassed.
It is possible to create a custom technique, but the options are quite limited. All custom techniques are based on OOTB ones.
When new technique is being created, one of the four base techniques can be selected:

Let's see the possibilities regarding customization.
- Static Replace (There are four different types of fields where the anonymization algorithm can be configured)
- Date Time value
- Date value
- Number value
- String value
- Date Time value

- Selective Replace
- Start index
- This value defines the position of the character, where the anonymization algorithm will start the character replacement action.
- This value defines the position of the character, where the anonymization algorithm will start the character replacement action.
- End index
- This value defines the position of the character, where the anonymization algorithm stops the character replacement action.
- This value defines the position of the character, where the anonymization algorithm stops the character replacement action.
- Exclude character
- A character can be defined, which will be excluded from the masking
- A character can be defined, which will be excluded from the masking
- Replacement char
- The content of this setting will be the replacement character
- Start index

- Random Replace
- Preserve data length
- If this is enabled the length of content will be the same like the original one
- Preserve data length

Anonymization policy
The Anonymization policy defines rules of data masking. There are two types of data which can be masked in this application:
- User specific data (fields in the sys_user table)
- All other tables

The big difference between these two types is that the user specific policy is capable of selecting user records, which will be part of the process.
Important: Only 10 records can be selected in one policy!
In the other case, all records in the table are affected.
When a new policy is created, the following information has to be added:
- Name of the policy
- Data class (Only one data class can be selected)

- The technique, which will be used on a specific field

In case of field(s) which we don't want to mask, selecting the No Action technique is needed. The Bulk Assign Techniques functionality can be used to select the desired technique for multiple fields.
When the configuration is done, the policy can be saved or published. Only the published policies can be scheduled and used for anonymization.

As it can be seen on the image the policy is published, but it is not possible to schedule it. The following conditions have to be met in order for scheduling to become available:
- The current policy has to be active
- One of the following roles has to be assigned to the current user:
- data_privacy_clone_processor
- Finally one of the above mentioned roles have to be elevated

Remember: In order to assign data_privacy roles the user must have the security_admin role, and need to elevate the role.
Schedule anonymization job
The anynomization process is executed as a scheduled job. The following information has to be filled out:
- Name of job
- Start time (format: HH:MM:SS)
- End time (format: HH:MM:SS)
- If the job doesn't finish until the end time, the execution will be continued on the next day.
- Dry run (preview)
- If this property is true, the masked data won't be committed to the database.
- Users
- This field is only visible, if the Data Class in the policy is user related (based on sys_user table)

The dashboard also contains the scheduled jobs:

There are two possible actions on a job:

After the job is executed, these actions won't be available.
If the Dry run (preview) option is enabled, the result is placed into a field of Data Privacy Job, called Summary (This information can be seen on the platform view):

In case of "accidents"
There can be a cases where the anonymized data has to be rolled back. This is a built-in functionality in Data anonymization.
There is a system property "glide.rollback.expiration_days_redact", which defines the availability of the Rollback option. The default value is 3 days. The function is available on the job view:

Important: A specific job can only be executed once.
Closing notes
To summarize the solution, in order to anyonimize data we need to do the following:
- Classify the data
- Define or select anonymization technique(s)
- Create a policy
- Define a job
All of these actions can be done on a modern front-end (based on UI builder), which makes the tasks of responsible people quicker and easier. The functionalities are structured and separated well and can be managed by roles.
Overall I like this solution. It has great potential and I'm looking forward to future improvements.
New features I would like to see:
- User limitation lifted
- A kind of condition builder (reference qualifier) should be added to the job in order to specify which records have to be anonymized (independently of the data type)
- A job can be executed periodically
https://www.servicenow.com/community/developer-articles/data-privacy-anonymization-in-practice/ta-p/2574772