
UI Policy Actions
UI Policy Actions are client-side logic in a UI Policy used to set three field attributes:
- Mandatory
- Visible
- Read-only
Although you can use scripts to set these attributes using the GlideForm (g_form) API, UI Policy Actions do NOT require scripting to set the field attributes.
Creating UI Policy Actions
- In Studio, create a UI Policy or open an existing UI Policy for editing.
- Scroll to the UI Policy Actions related list. If creating a new UI Policy, the UI Policy must be saved before the UI Policy Actions related list is visible.
- Click the New button.
- Configure the UI Policy Action.
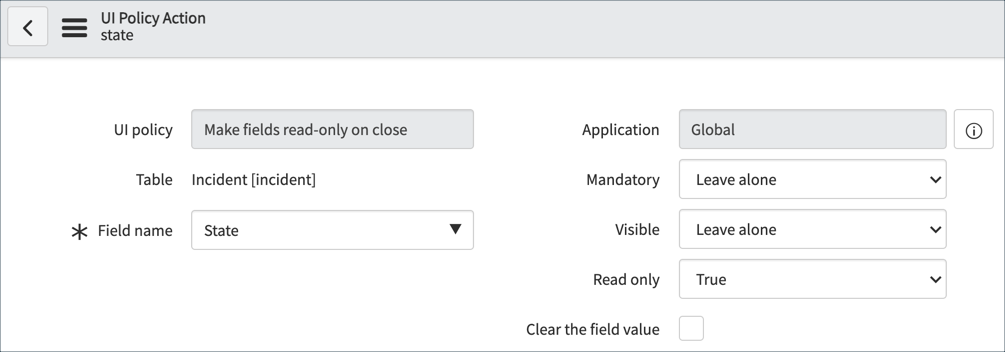
Select a Field name.
Set the Mandatory, Visible, or Read-only field values.
5. To clear any existing value from the field, select the Clear the field value option.
6. Click the Submit button.
When the UI Policy condition tests true, the UI Policy Actions are applied. In the example, the State field is Read-only. The Mandatory and Visible attribute values are not changed by the UI Policy Action.
What happens when the UI Policy condition tests false? There are two possible outcomes:
- No action is taken
- The opposite action is taken
How does ServiceNow know which to do? The decision is made by the Reverse if false option in the UI Policy trigger.
- If Reverse if false is selected (default), the opposite action is taken in the UI Policy Actions. If a field is mandatory (true), the field will no longer be mandatory (false). That is to say, attributes that were true become false, and false become true. There are no changes to attributes that are set to Leave alone.
- If Reverse if false is not selected, no UI Policy Action logic is applied.
Creating UI Policy-Related List Actions
Use UI Policy Related List Actions to show or hide related lists. The Problem form has multiple related lists:
- Incidents
- Affected CIs
- Problem Tasks
- Change Requests
- Outages
- Attached Knowledge
- In Studio, create a UI Policy or open an existing UI Policy for editing.
- Scroll to the UI Policy Related List Actions related list. If creating a new UI Policy, the UI Policy must be saved before the UI Policy Related List Actions related list is visible.
- Click the New button.
- Configure the UI Policy Related List Action.
Select a List name.
Set the Visible field value.
5. Click the Submit button.
The Incidents related list is hidden:
https://medium.com/@LearnITbyPrashant/ui-policy-actions-9f5758eb0a0a?source=rss-d005fc598f0a------2