
Migrating from IP address access control to Adaptive Authentication
IP address access control
Apply an IP access control to outbound traffic, inbound traffic, or bidirectional traffic. The system only blocks an IP address if a matching Deny rule exists and no matching Allow rule exists. By default, there are no restrictions on access to your instance.
Adaptive Authentication
Adaptive authentication is a policy framework to enforce contextual authentication controls to the right users at the right time. Adaptive authentication uses authentication policies to evaluate authentication requests and either deny or allow access to your instance based on the specified policy conditions.
Admins can use adaptive authentication policies and contexts to restrict access to the instance for users and APIs based on criteria like IP address, user role, and user group.
Why migrate to Adaptive Authentication
- Supports CIDR-based IP range definition
- Use user attributes like role/group membership and authentication methods used for logging in to enforce granular restrictions.
- Change the error code/message shown for blocked sessions.
- Enforce step-authentication based on the IP range and user attributes
Activating Adaptive Authentication
Enable Adaptive Authentication (com.snc.adaptive_authentication) plugin
Enabling The System Properties
Steps: -
- Open Adaptive Authentication > Properties
- Adaptive Authentication -> Authentication Policies -> Properties
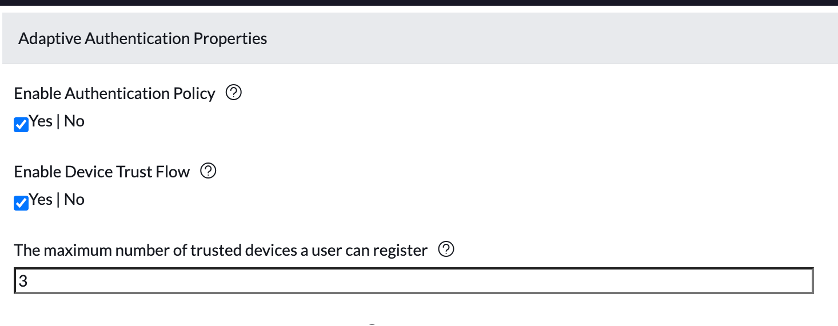
- Enable the following properties.
- Enable Authentication Policy
- Enable Device Trust Flow
- Enable Authentication Policy

Migrate IP Filter Criteria
- If you already use the IP address access control feature, IP filter criteria can be created automatically by importing data from IP access control inbound IP ranges.
- Go to System Security > IP address access control.

- Click on the “Migrate to IP filter Criteria” related link. This will only appear if active IP ranges are available in the IP_access table for inbound IP restrictions.

- Upon clicking on the UI action, a scheduled job (Migrate IP Address Controls to Adaptive Authentication IP Filter) will start in the background to migrate IP ranges to IP criteria. The job will create new IP criteria. Two IP criteria will be created if both allow and deny ranges are defined.
- Is allow Migrated IP Filter
- Consist of all active inbound IP ranges that are of “Allow” Type
- Consist of all active inbound IP ranges that are of “Allow” Type
- Is deny Migrated IP Filter
- Consist of all active inbound IP ranges that are of “Deny” Type
- Is allow Migrated IP Filter

Another example

- You can go ahead and rename the filter as needed.
- Once you have migrated the IP ranges, the related link will disappear.

Create IP Filter Criteria
- If IP ranges are not defined as part of IP access control feature, then the admin can manually create IP criteria.
- Navigate to Adaptive Authentication -> IP Filter Criteria
- Create an IP filter as desired. Product doc

Steps To Configure Policy
- Navigate to Adaptive Authentication -> Pre-Authentication Context
- Change the Default Policy to “Allow Policy” and observe that the “Allow policy” is mapped to Allow Access Policy.

- Open the Allow Access Policy reference record; click on the Edit button for Policy Input.
- Select the IP filter created/migrated in the last step
- Also, select the Trusted Mobile app filter and save the record.
- Open Policy Conditions, and click on the “New” button
- Create OR condition as below
- The trusted IP range is true, OR the Trusted Mobile app is true.

- Save the Condition
- Instance access would be allowed from all the devices connecting from a trusted network. Access originating from untrusted networks would be allowed only from trusted mobile apps. All non-trusted mobile app access would be blocked from untrusted networks.
- Users would be forced to undergo the device registration process upon accessing the instance from Mobile apps.
Deactivate IP address access control
- Deactivate all inbound IP ranges, as you have already migrated to pre-auth

Mobile App Registration Process
- Users will see the device registration screen when clicking on the instance name.
- Users must open another session from a desktop/laptop connected to the trusted network.
- Click on the "Register a trusted mobile device" related link in the user profile section.


- Click on Add New Trusted Device Link

- Scan the QR code from the mobile app
- Upon successful validation, the device will be registered to the user account, and the user will be redirected to the login page.

After completing these steps users connecting from the trusted mobile device would be able to access the instance from outside the trusted network as well.
Labels:

https://www.servicenow.com/community/now-platform-articles/migrating-from-ip-address-access-control-to-adaptive/ta-p/2409855