
ServiceNow TSOM Discovery
 New article articles in ServiceNow Community
·
Jun 08, 2025
·
article
New article articles in ServiceNow Community
·
Jun 08, 2025
·
article

In the Yokohama release, ServiceNow introduced new discovery patterns specifically for Telco equipment discovery.
Telco-Specific Discovery Pattern
The new Telco-specific discovery pattern introduced in the Yokohama release is tailored to meet the unique needs of telecommunications network inventory management. It focuses on discovering Telco equipment such as routers, switches, and other network infrastructure components. The key features of the Telco-specific discovery pattern include:
- Detailed Inventory: Provides a comprehensive inventory of Telco assets, including detailed information about each component, component hierarchy and their relationships.
- Integration with Telco Systems: Seamlessly integrates with existing Telco management systems, enabling better coordination and management of network resources.
- OOB discovery pattern for selected Cisco and Juniper Routers and Switches
- Cisco ASR1K
- Cisco 7613
- Cisco Nexus 9000
- Cisco Nexus 3548
- Juniper Mx80
- Juniper MX104
- Juniper MX240
- Juniper MX480
This article refers TSOM Discovery - inventory discovery from elements by @roy_silon and attempt to demonstrate how the new TSOM discovery is different from traditional ITOM discovery and help telco service provider in network discovery and network reconciliation.
Plugin details
Plugin name: Telecom Discovery Patterns
App Id: sn_tsom_patterns
Dependency: Telecom Service Operations Core
Configuration to enable TSOM Discovery
Once the plugin is installed, the TSOM Discovery pattern can be enabled by below setting.
- Update the property "sn_tsom_patterns.itom_pattern_enabled" to false.


TSOM Discovery of Cisco Nexus 9000v Switch
I have my lab set up with Cisco Nexus 9000v switch as below:

This switch has 64 Ethernet interfaces and 1 management interface. Below is the snippet of the running config.

The management interface is configured with ip address 20.0.0.12 which will be used for discovering this device.
TSOM vs ITOM Discovery comparison for Nexus 9000v
Here is a quick comparison view TSOM and ITOM discovery for Nexus 9000v switch.
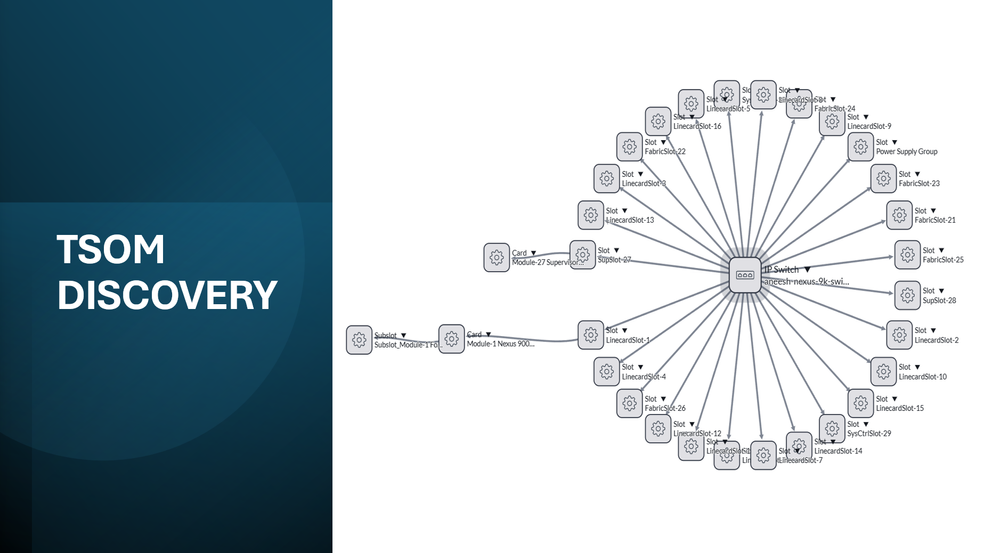
TSOM Discovery result
You can clearly see the TSOM Discovery in combination with TNI device hierarchy models creates a more comprehensive view of the telco equipment with multiple levels of hierarchy and their relationship.
TSOM discovery identified 33 CI's. It identified SLOT, SUBSLOT, CARD and IP Switch. It was able to build all the hierarchical relationship between all these elements.


Dependency view provides a quick

ITOM Discovery Result
While TSOM discovery identified 30+ CIs, ITOM discovery identified only 1 CI. You can see the dependency view showing only the Switch.
This do not mean that ITOM discovery is inferior in any manner. You can see the information being brought in and stored in their respective tables like SwitchPort, Switch Forwarding Rules, Switch Bridge Port Table and Switch Spanning Tree Tables, Device Neighbors, etc.


Dependency map view


TSOM Discovery Details
Telecom Discovery Patterns plugin introduces new set of discovery patterns specifically for Telecom industry.

If you are familiar with discovery, you would already know about the SNMP OID Classification table and how OIDs can be mapped to their classifier.
TSOM Discovery has introduced a table for mapping OIDs to corresponding Pattern: sn_tsom_oids_to_pattern (please note there is no application module created for this table and hence not searchable from filter navigation.
Here is the mapping that comes OTB with the plugin:

How to use OIDs to Pattern Mapping Table
OIDs to Pattern Mapping table will come in handy if you want to map any of the vendor OIDs to existing pattern or a new custom build pattern as below:
1) Identify the sysObjectId of your telco equipment: in my case: 1.3.6.1.4.1.9.12.3.1.3.1951 (this will be vendor and model specific)
2) Create a record in OIDs to Pattern Mapping Table for this OID and select the pattern you want to run for horizontal discovery.
Notice the initial pattern that got run for the Nexus Switch: Telecom Switch

Now lets look for the SysObjectID value for this switch. For this open the input ECC Queue message for SNMP Classify.

Then open the xml Payload to find the sysObjectId oid: .1.3.6.1.4.1.9.12.3.1.3.1951

Create a new record for this OID in SNMP OID Classification table first (not needed if its already present) and then one in OIDs to Pattern Mapping table as below:


With this configuration, the next discovery on this device will pick "Telecom Cisco Switch" pattern for Horizontal Discovery (please notice in the above screenshot, the earlier pattern was Telecom Switch).

Hope this if useful. In a subsequent article I will explain how to extend these out of the box pattern to fetch additional data points.
If you want any further details/clarification on any of topic on this article, please leave a comment!
https://www.servicenow.com/community/telecom-articles/servicenow-tsom-discovery/ta-p/3284068